By Will Li | Version 0.1.0 [DRAFT] | 21 May 2026
Repository Link (branch v0.1.0) | Changelog
Find more resources at: https://williamli9300.github.io/
This guide is meant as a quick reference guide for the software operation of Hy-Tek Swim Meet Manager 8. This guide is not a replacement for the thorough knowledge of the rules and roles of the Admin Desk and/or Recorder/Chief Recorder.
Ctrl + F or Cmd + F to search for a key word, or use the Contents menu on the left to find what you're looking for.
Getting Started
Intro to Hy-Tek Meet Manager
When running Multi-User/Networked mode, NEVER close your laptop/computer without first EXITING COMPLETELY out of HyTek Meet Manager. Otherwise, you may "lock" the database into Multi-User mode for another user who may want to work in Single-User Mode.
- To EXIT COMPLETELY out of HyTek Meet Manager, close all windows, click the
X at the top right of the Home screen, and clickOK when theExit MEET MANAGER ? pop-up appears.
Click to expand section.
Navigating HyTek: The Home and
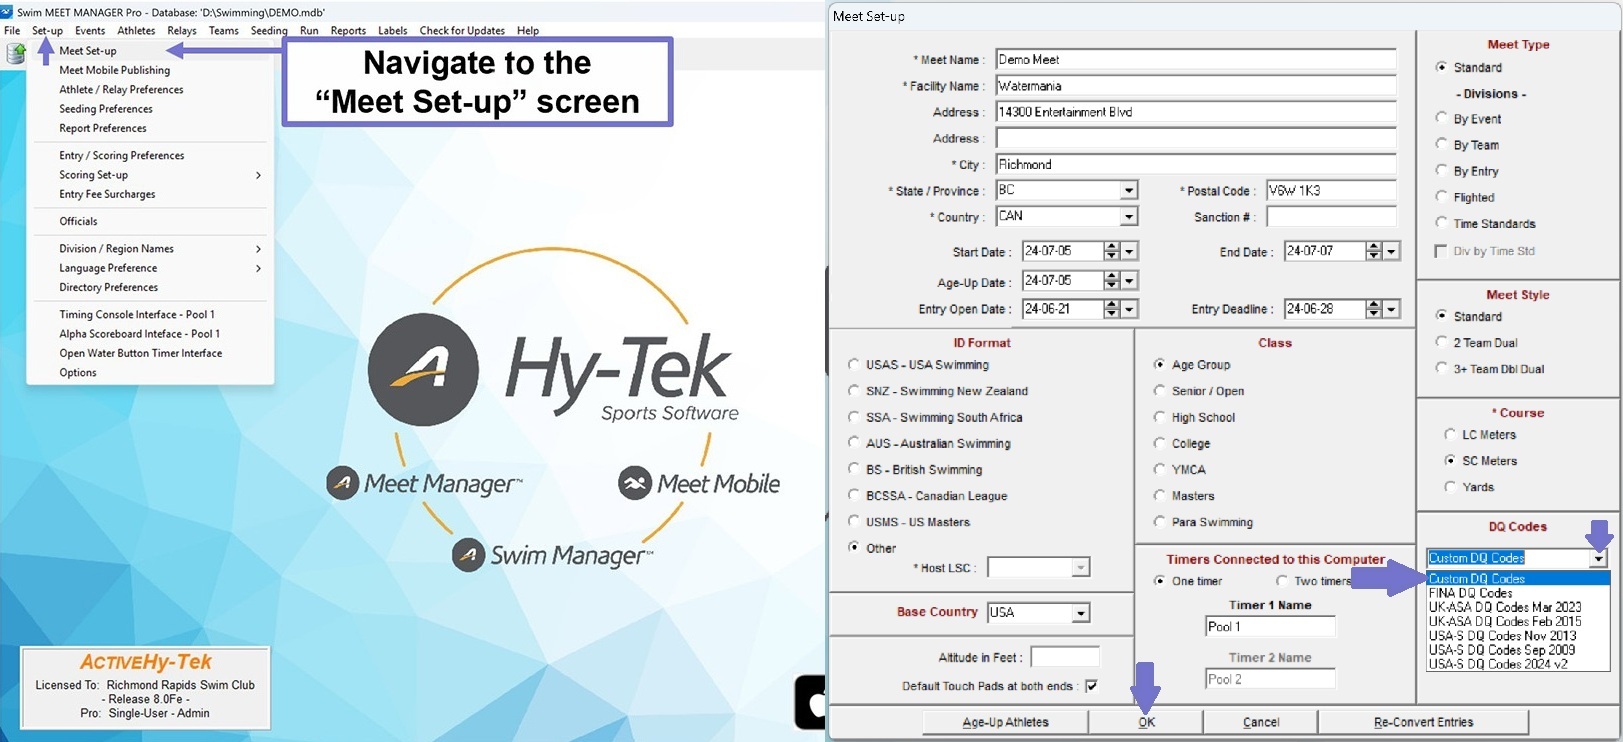
Setting Up Custom DQ Codes
DQ codes are useful for administrative uses. They allow DQ reasons to be (optionally) printed in Results (or DQ only results, also known as DQ Reports), and can help quickly find DQ reasons if, for example, a previous session's DQ slips have already been filed away in the Meet Office. See Paperwork: Results for more information.
- Add a Custom DQ Codes file (
dqcodesCustom.txt) to the Meet Manager directory (C:\Hy-Sport\SwMM8). - You can find a Custom DQ code file at https://github.com/
williamli9300/ .swimOfficialsToolkit/ blob/ v0.1.0/ HyTekFiles/ dqcodesCustom.txt - Copy the contents of that file, then open
C:\Hy-Sport\SwMM8using a text editor, then paste the contents into the text file. - From the Home screen, navigate to
Set-up >Meet Set-up . Select Custom DQ Codes.
🛈 About the
dqcodesCustom.txtfile. (click to expand)The
dqcodesCustom.txtCustom DQ Codes file is formatted as follows:"[CODE]","[DESCRIPTION]","[STROKE]"The following
CODEvalues are reserved:
7Q: Did Not Finish (DNF)7P: Declared False Start (DFS)
- Note: DFS is not the same as Initiated Start Before Starting Signal (SW 4.4). DFS is not counted in disqualification tallies and is not reported as a disqualification.
6A: [Relay] Stroke infraction by Swimmer 16B: [Relay] Stroke infraction by Swimmer 26C: [Relay] Stroke infraction by Swimmer 36D: [Relay] Stroke infraction by Swimmer 4
- Note: These DQ codes will let you select the type of infraction committed by the swimmer.
The
dqcodesCustom.txtfile requires Windows style (CRLF) new lines. Copy the text as above, or download the*.zipfile containing the properly formatted*.txtfrom here.
Selecting Custom DQ Codes. (Click to collapse image.)
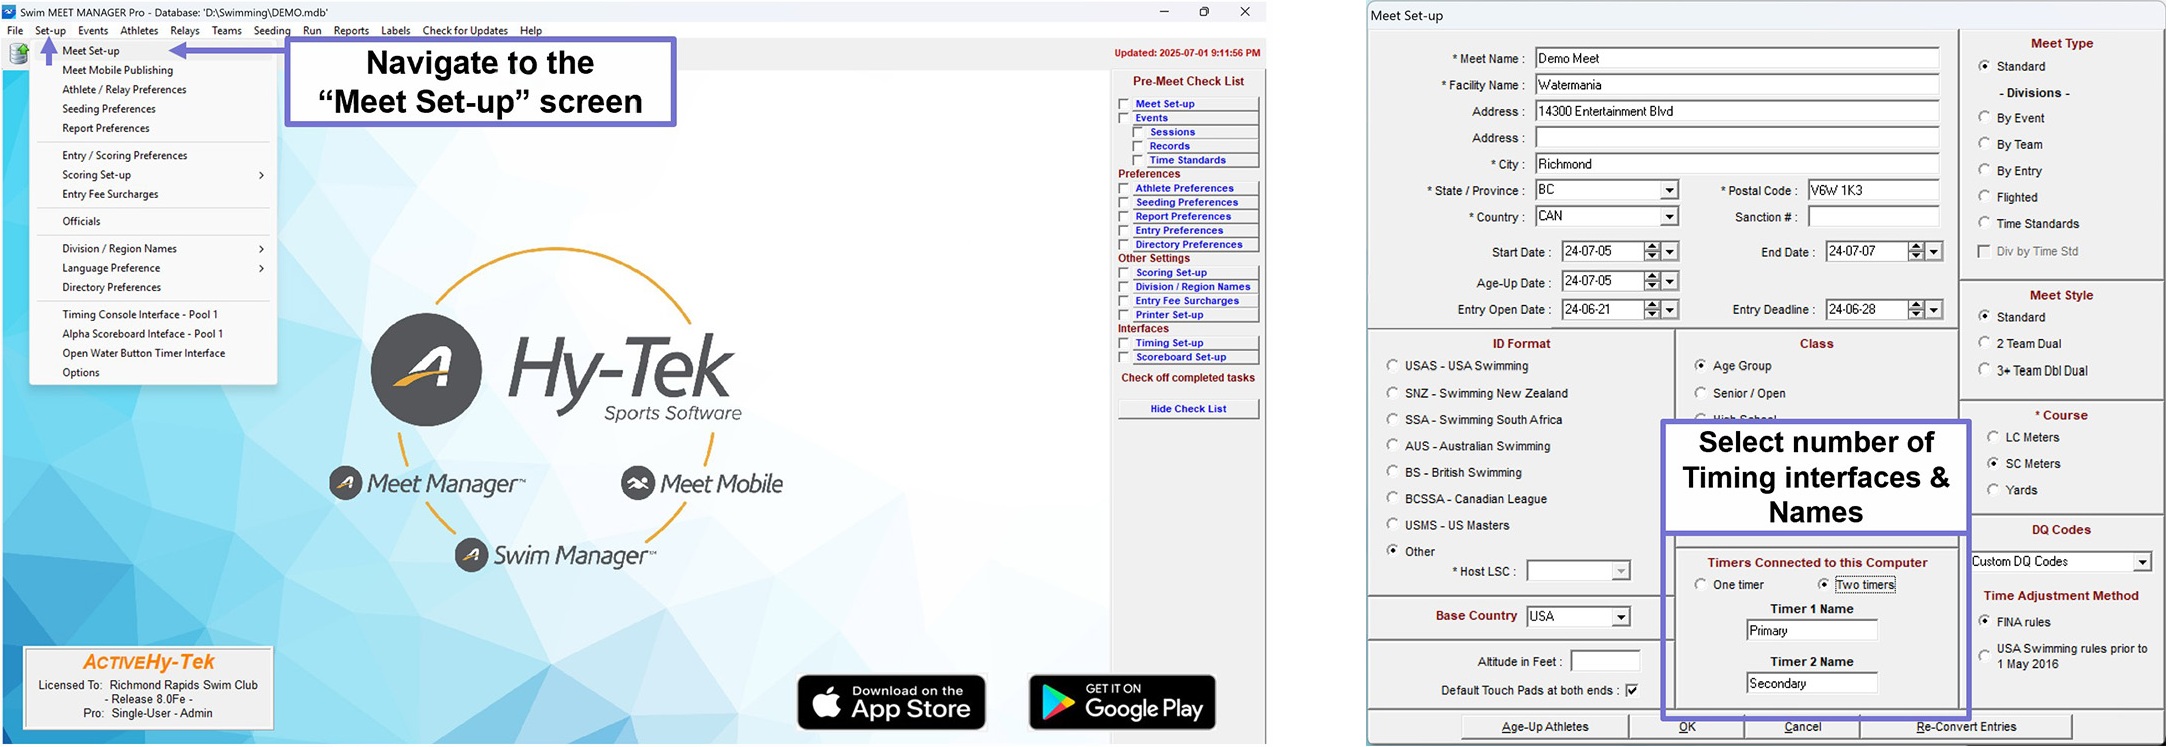
Setting Up Timing Interfaces
- From the Home screen, navigate to
Set-up >Meet Set-up . Adjust the number of Timing Interfaces (and their names) as needed. Each Quantum Computer is one Timing Interface ("Timer").
Selecting number of Timing Interfaces & setting up names. (Click to collapse image.)
🛈 Common HyTek & Quantum Connection Configurations. (click to expand)
- Single-ended, one HyTek computer and one Quantum computer:
- One Timer connected.
- Single-ended, one HyTek computer and two Quantum computers (Primary & Secondary):
- Two Timers connected, named
Primary andSecondary .- Double-ended, one HyTek computer, and one Quantum computer at each end (Deep End & Shallow End):
- Two Timers connected, named
Deep andShallow .- Double-ended, two HyTek computers (one at each end) and two Quantum computers (
Primary & Secondary) at each end:
- Deep End HyTek Computer: Two Timers connected, named
Primary-D andSecondary-D .- Shallow End HyTek Computer: Two Timers connected, named
Primary-S andSecondary-S .
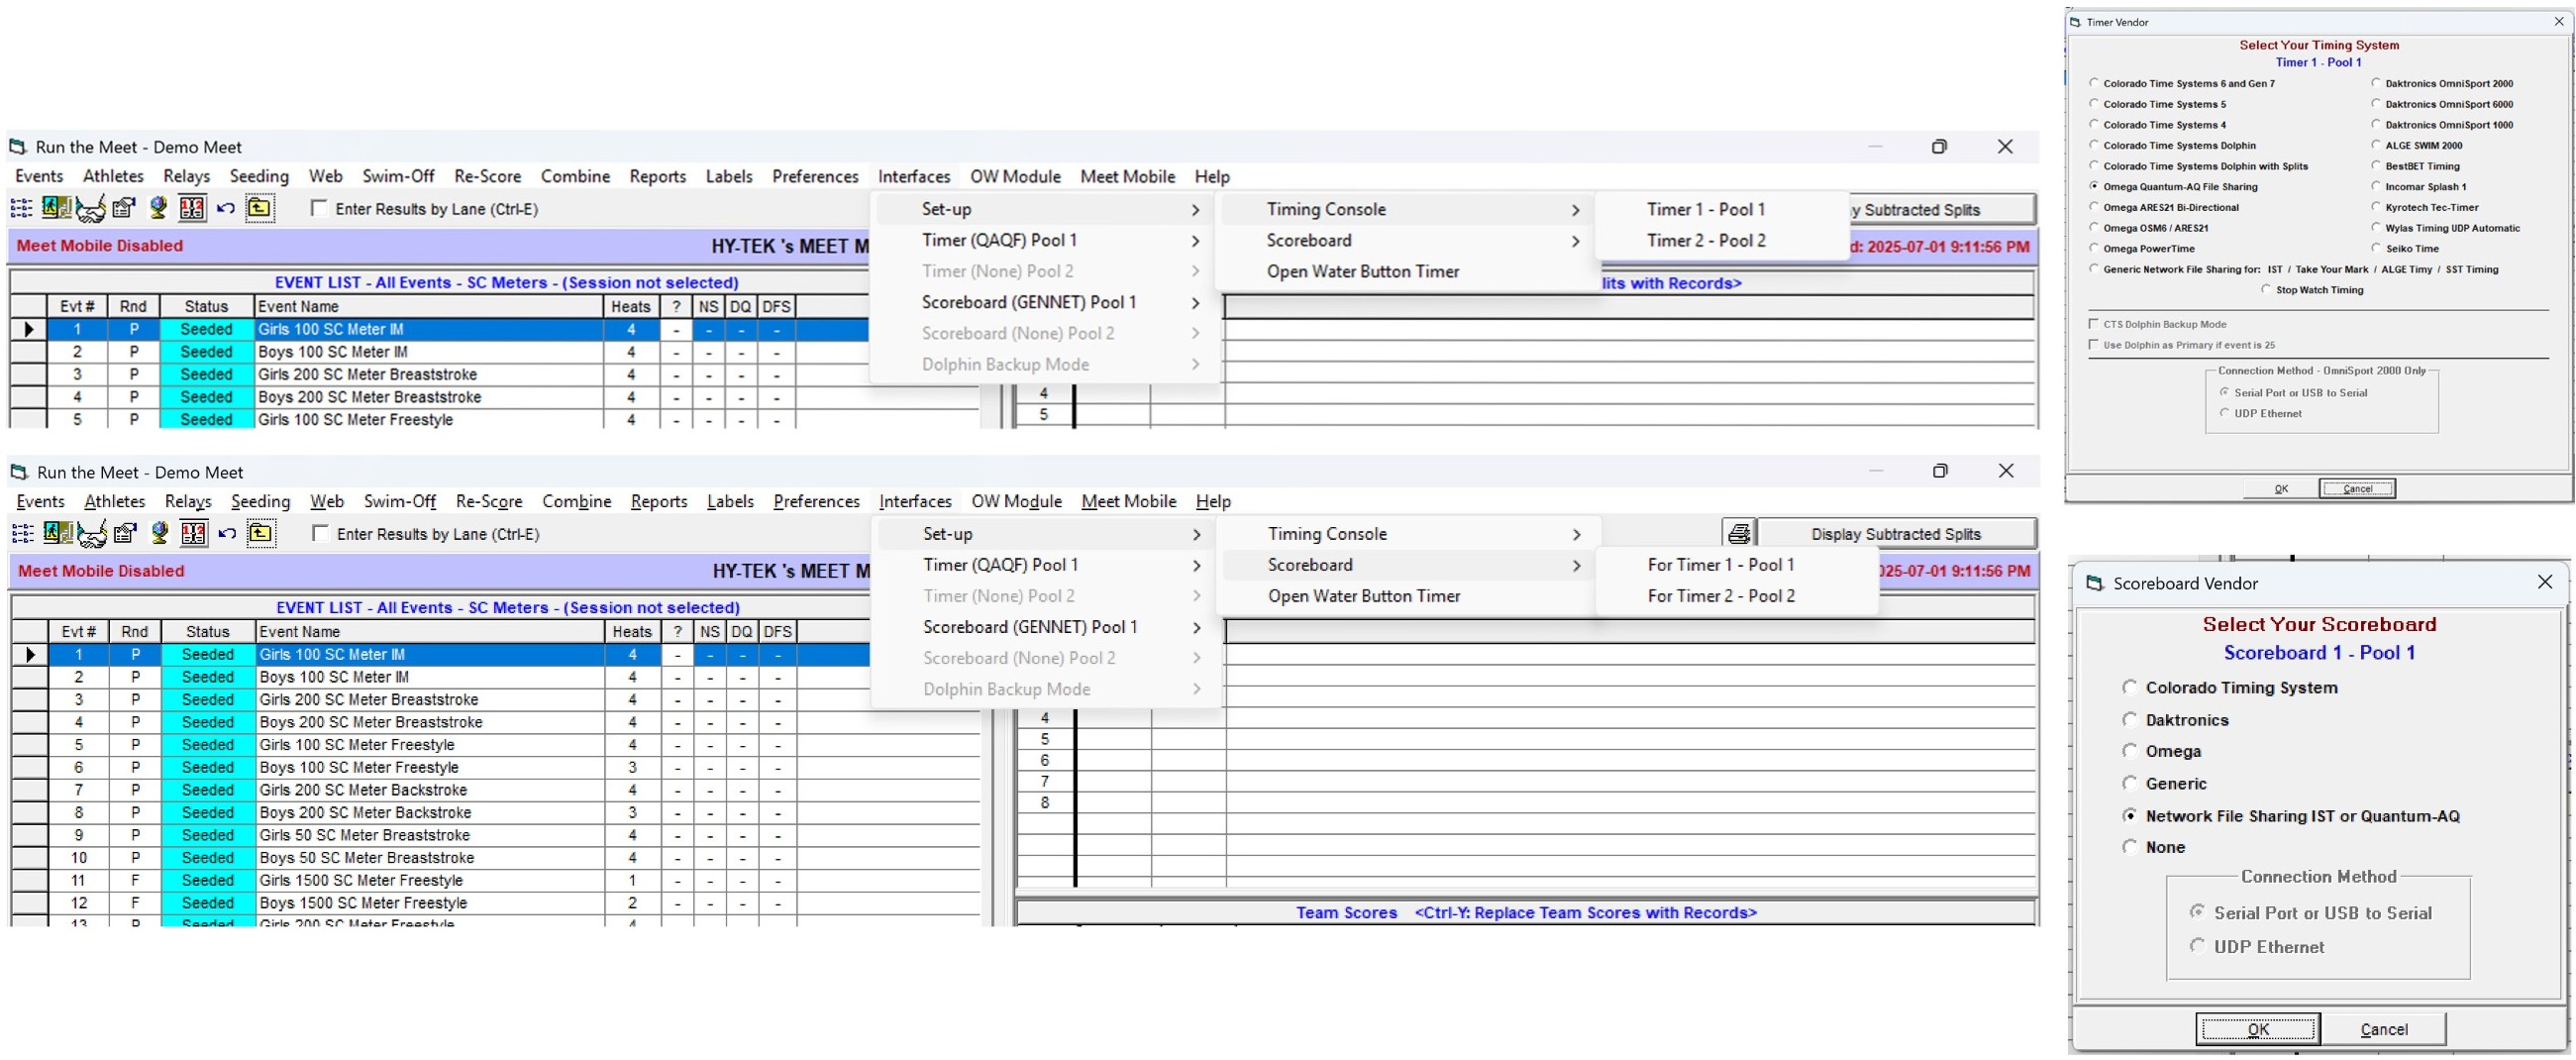
- From the
Run screen, navigate toInterfaces >Set-up to set up theTiming Consoles andScoreboards as necessary, according to the pictures below. - For meets running on Quantum, set your Timing System to
Omega Quantum-AQ File Sharing , and your Scoreboard asNetwork File Sharing IST or Quantum-AQ .
Selecting your Timing Console & Scoreboard. (Click to collapse image.)
- From the Home screen, navigate to
Help >About . - Check which License Options are checked.
Note: without the
[Quantum-AQ Specific] Pushing Events & Names to Quantum
Selecting your Quantum-AQ Folder
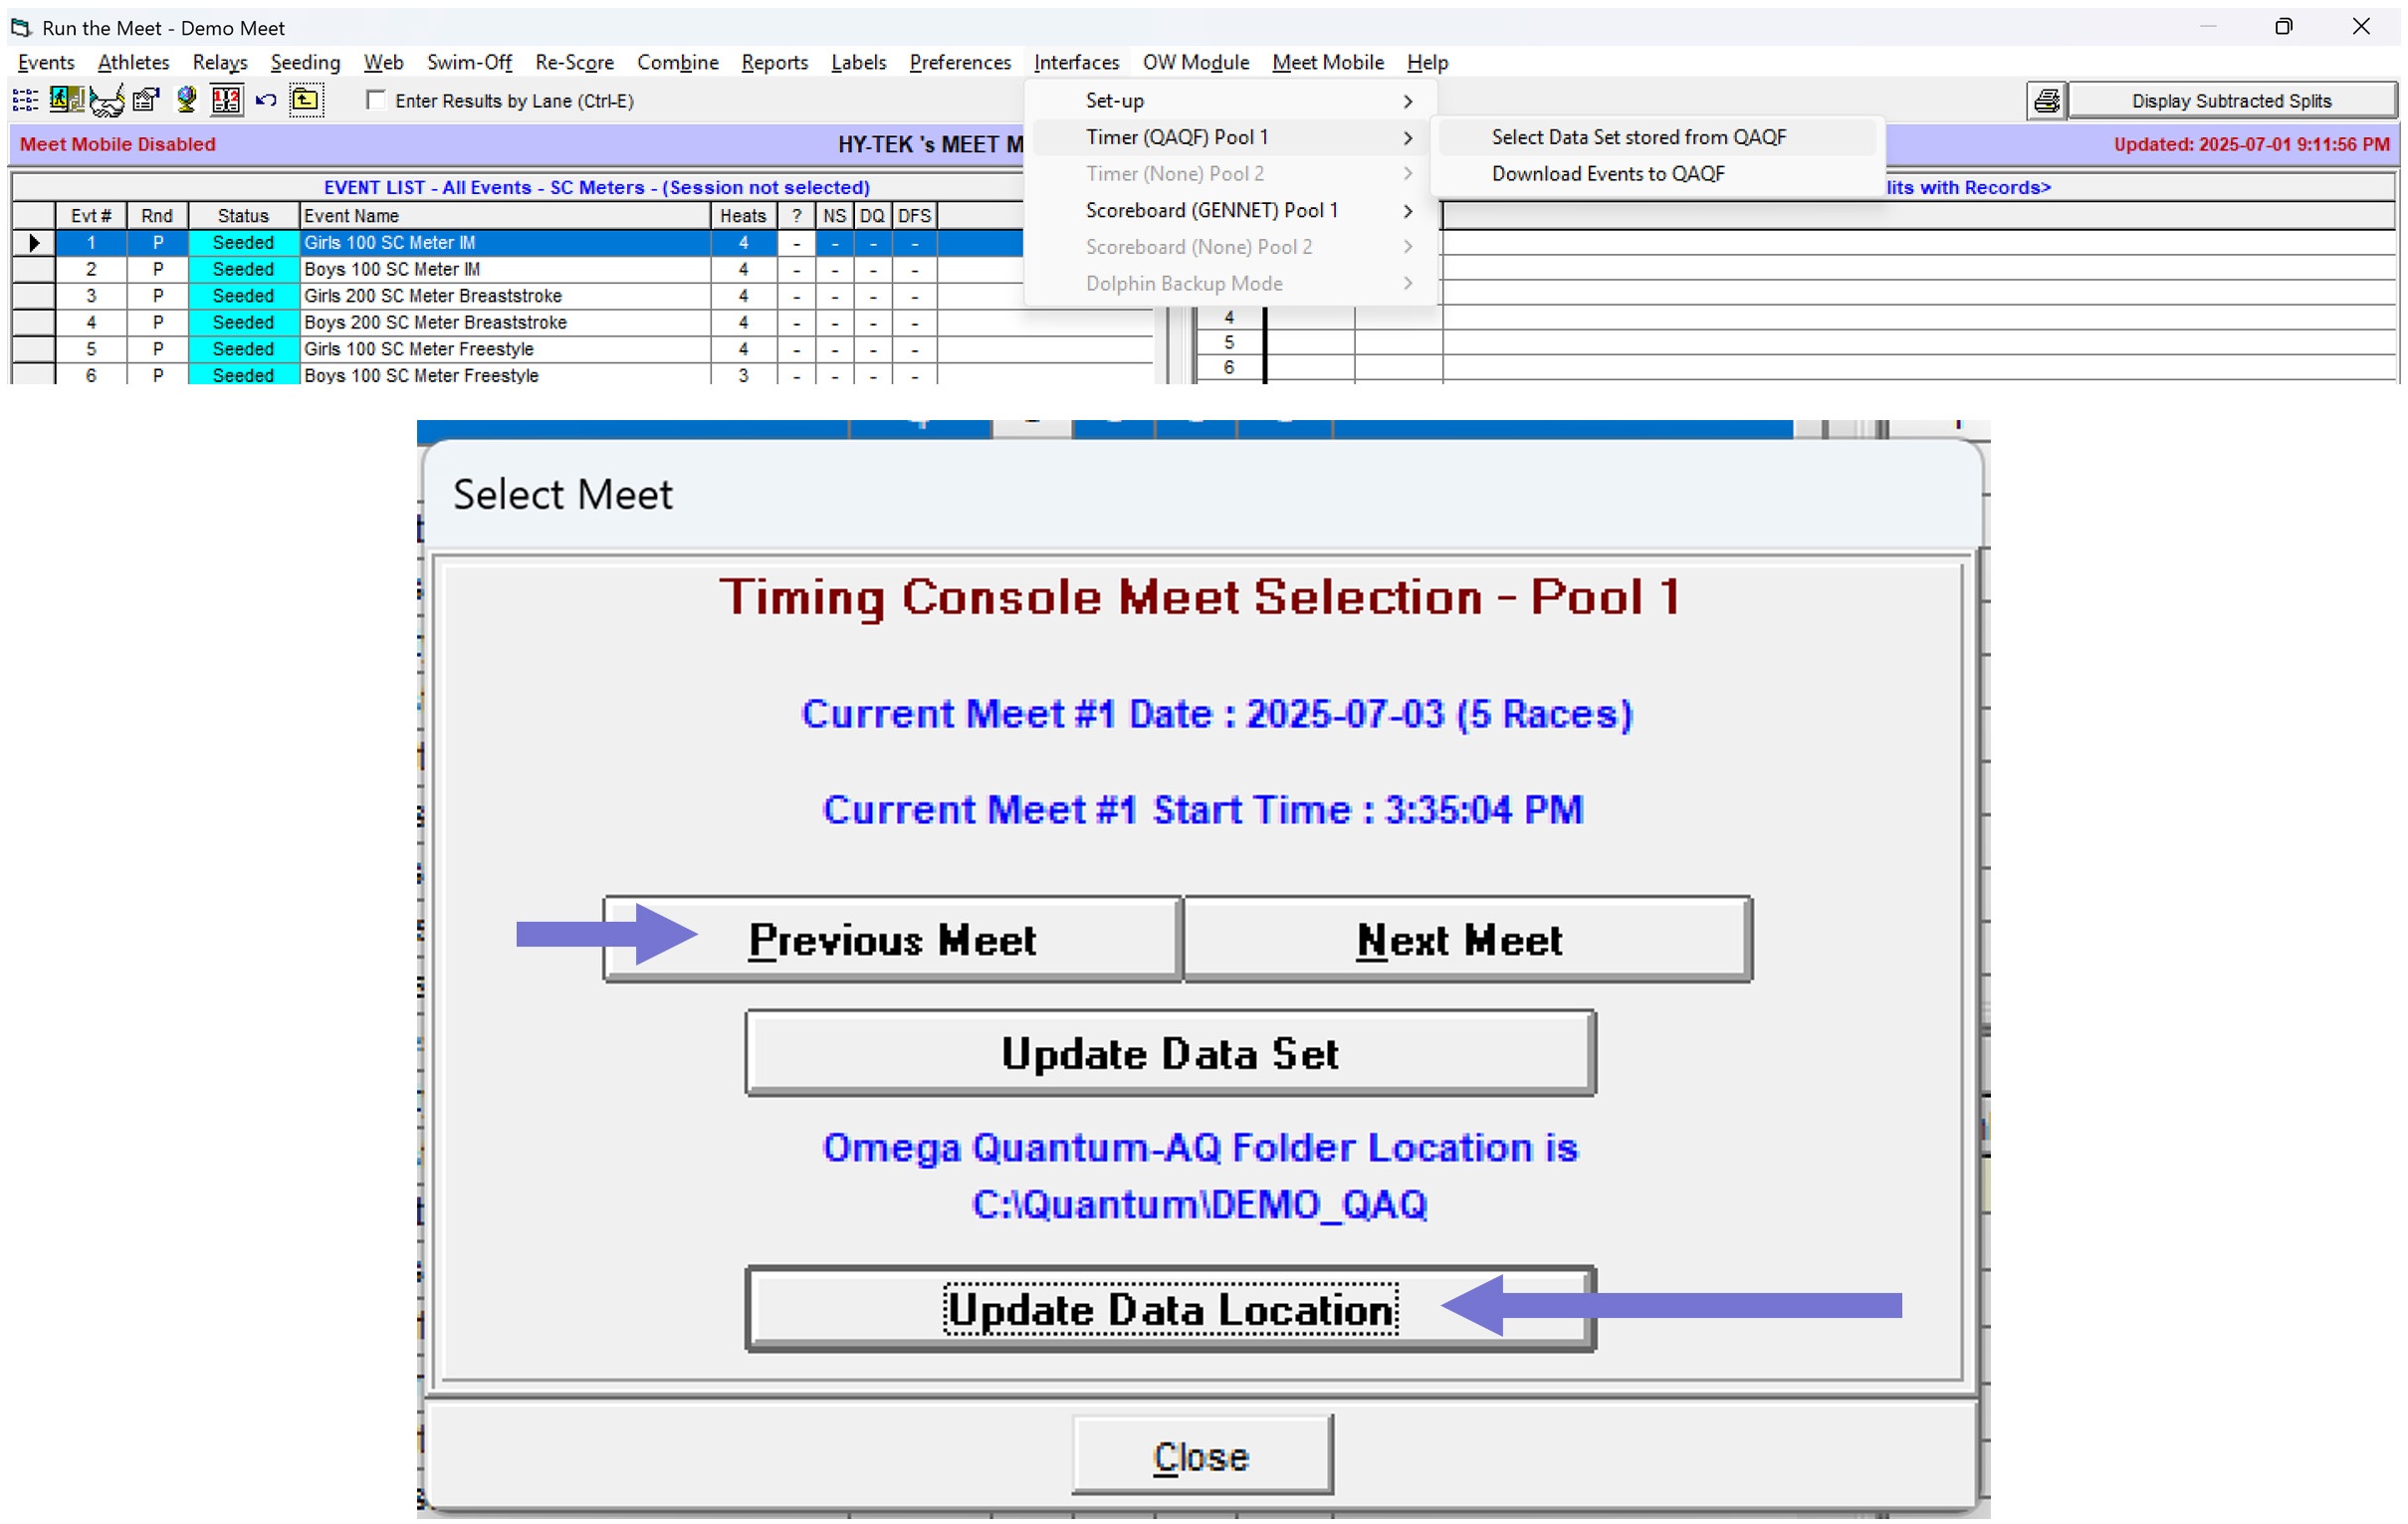
- From the
Run screen, clickSession : F7 . Select your current session, then clickOK . - From the
Run screen, navigate toInterfaces >Timer (QAQF) [Name] >Select Data Set stored from QAQF . - Click
Update Data Location to select your Quantum data folder. - Use the
Previous Meet button to ensure that "Current Meet #" shows "Meet #1".
Configuring Quantum-AQ Timing Console communication. (Click to collapse image.)
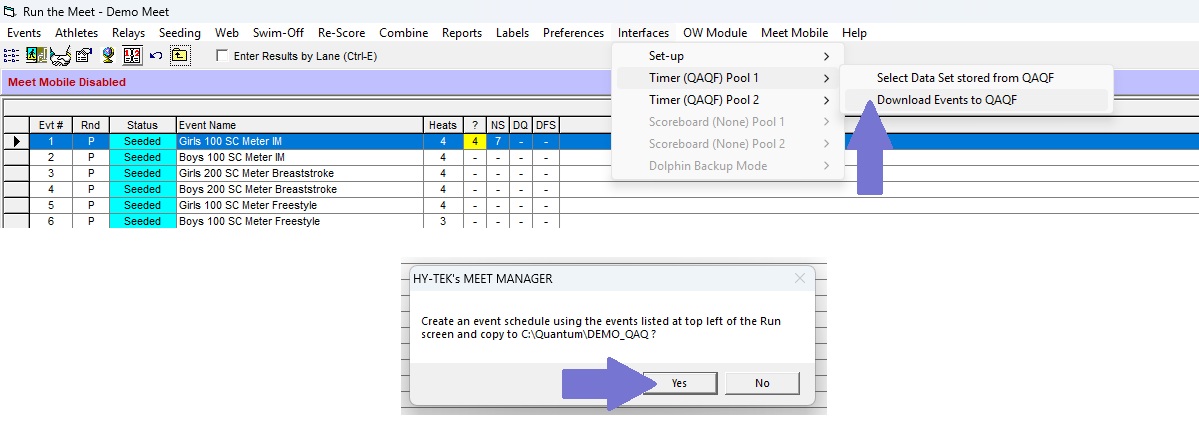
Pushing Events (Schedule) to Quantum-AQ
- From the
Run screen, navigate toInterfaces >Timer (QAQF) [Name] >Download events to QAQF .
Pushing Event Schedule to Quantum-AQ. (Click to collapse image.)
- If using two timing interfaces, repeat steps 2-5 for the second timing console..
🎞 GIF: Pushing Event Schedule to Quantum-AQ. (Click to collapse image.)
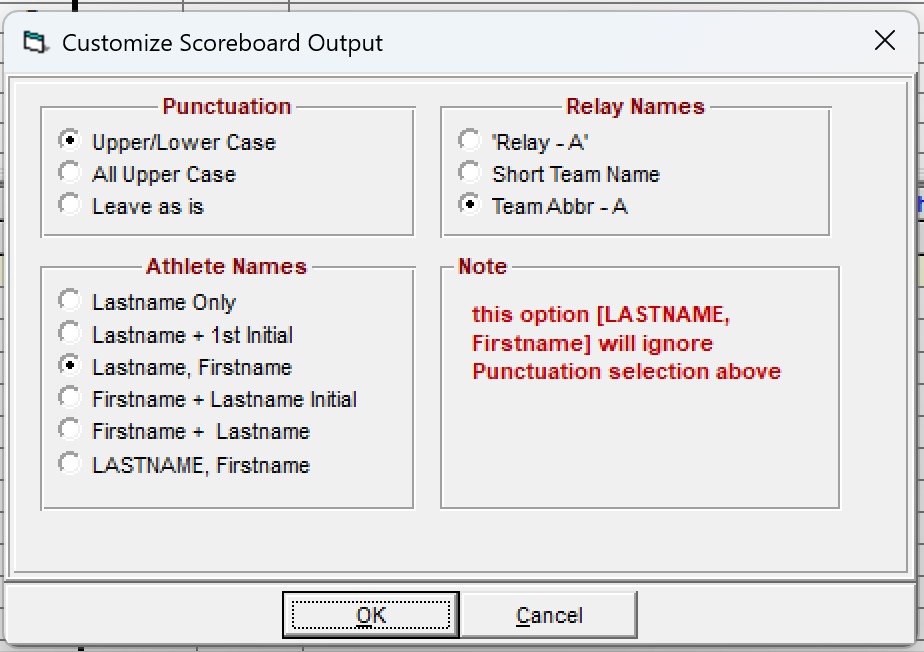
Pushing Names (Start List) to Quantum-AQ
- From the
Run screen, navigate toInterfaces >Scoreboard (GENNET) [Name] >Customize . Ensure the settings are set to the same ones as below, then clickOK : - Punctuation:
Upper/Lower Case - Athlete Names:
Lastname, Firstname - Relay Names:
Upper/Lower Case
Start List Customization Settings. (Click to collapse image.)
- From the
Run screen, navigate toInterfaces >Scoreboard (GENNET) [Name] >Create Start List File . - If using two Timing Interfaces, repeat Step 2 for the Scoreboard under the second Timing Console.
XXXX-A or TEAM-B) see https://github.com/Running a Meet
Pulling Times
- From the
Run screen, select your desired Event from theEVENT LIST , then select your desired Heat from the Heats bar. - Click the orange button labelled
[Name] : F3 or the blue button labelled[Name] : Ctrl-F3 (or the corresponding hotkeys) to pull times from the corresponding timing system. - Note: the directory that each button pulls times from is configured in the Setting Up Timing Interfaces section.
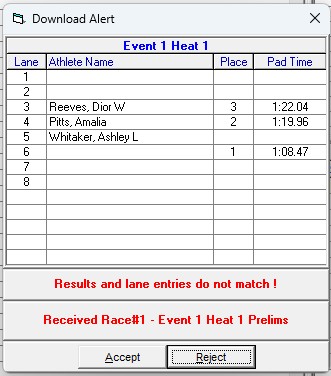
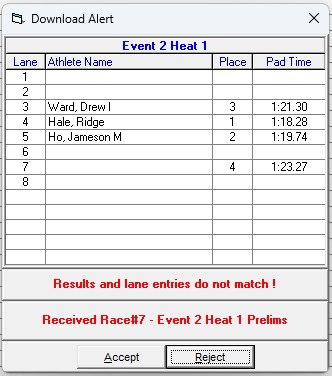
- Note: if pulled results and entries do not match (e.g., there were No Shows or Deck Entries that have not yet been processed), you will get a
Download Alert pop-up. Sanity-check the times underPad Time and clickAccept orReject as appropriate. - Times that do not match with a name will be ignored. Names that do not have a time will be marked as NS.
The Download Alert pop-up. (Click to expand image.)
Pushing Event Schedule to Quantum-AQ. (Click to collapse image.)
Manually Entering Times
- From the
Run screen, select your desired Event from theEVENT LIST , then select your desired Heat from the Heats bar. - Click corresponding cell for
Prelims Time /Finals Time ,Backup 1 ,Backup 2 , orBackup 3 . Type in the time manually (you don't need to enter any colons ":" or decimal points ".").

- Alternatively, if you know the Race Number, you can click the corresponding orange
Race # : F2 or blueRace # : Ctrl-F2 buttons, then enter the race number, to pull the times in the*.qaqfile with the corresponding race number, into the currently selected heat. (See Combined Heats or About.qaqFiles for more information.)
🛈 Understanding
Each time a race is completed and saved in the Quantum-AQ, it creates a result file in the shared data folder. This file has the extension.qaqfiles. (click to expand).qaq, and when using HyTek, will have the following file name format:
For example,DDD-EEE-HHXRRRR.qaq001-001-01F0001.qaq:Each
- The first 3 characters of the file name (
DDD) is a three-digit number from 001 to 999. These characters define the Data Set number. For most meets you will work, you will only use Data Set 001.- The next 3 characters of the file name (
EEE) is a three-digit number from 001 to 999. These characters represent the Event Number of the race.- The next 2 characters of the file name (
HH) is a two-digit number from 01 to 99. These characters represent the Heat Number of the race.- The next 1 character of the file name (
X) is a letter (T, P, S, F) representing the type of race that is swum (i.e. Timed Finals, Prelims, Semifinals, Finals.)- The last 4 characters of the file name (
RRRR) is a four-digit number from 0001 to 9999. These characters represent the Race Number, and can be used to manually pull the file to any heat using theRace # button.*.qaqfile is actually a Semicolon-Separated Values file. Here's an example of what that might look like for an individual 200m event in a 25m, 8-lane pool:101;1;4;F;100;QuantumAQ;6.1.21.0
0;;;;;;;;
0;;;;;;;;
0;;;;;;;;
1; ;71.86;145.96;145.90;145.80;;0.66;
2; ;73.78;146.09;146.11;145.99;;0.59;
0;;;;;;;;
0;;;;;;;;
0;;;;;;;;To summarize, based on Lane 4:
- The first line contains the
Event,Heat, andNumber of Touches(N) values, followed byRace Type(equivalent toXabove), and some information about the Quantum version that the file was created by.- The next
nlines correspond to thenlanes in the pool, with the lowest number at the top, typically1-6,1-8, or0-9:
- The first column of each line corresponds to the
Rankof the lane (i.e., what place the swimmer came in the heat)- The second column is empty.
- The next
Ncolumns correspond with the cumulative split time, in seconds, at theNth touch. Since this is a 200m event, we are expecting 4 touches: the times thus correspond to the 50m, 100m, 150m, and 200m split times, in seconds.- The next 3 columns correspond with Backups 1, 2, and 3, as recorded by Quantum. Here, we only have two plungers in each lane, so the third column is empty.
- The last column contains the reaction time of the swimmer off the start.
- Note 1: When a lane is unused, all the semicolons are collapsed (i.e. no spaces between them).
- Note 2: Newer versions of the Quantum software will always write 12 lanes, regardless of how many lanes are used. HyTek will always ingest the
*.qaqfile with the lowest lane number at the top, and extra lines at the bottom are ignored.Here's an example of what aRANK ; empty ; SPLIT; FINAL; B1; B2; B3; RT;
1 ; ; 71.86; 145.96; 145.90; 145.80; ; 0.66;.qaqmight look like for a 4x50m relay event in a 50m, 10-lane pool:121;1;4;F;100;QuantumAQ;6.1.23.0
0;;;;;;;;;;;;;
0;;;;;;;;;;;;;
0;;;;;;;;;;;;;
0;;;;;;;;;;;;;
1; ;31.27;66.68;97.78;136.99;136.91;136.02; ;0.66;-0.10;0.24;0.33;
2; ;33.19;67.26;97.74;136.59;136.57;136.68; ;0.59;0.21;0.57;0.12;
0;;;;;;;;;;;;;
0;;;;;;;;;;;;;
0;;;;;;;;;;;;;
0;;;;;;;;;;;;;
0;;;;;;;;;;;;;
0;;;;;;;;;;;;;To summarize, based on Lane 4 in the above example:
- The first line header is formatted the same as above.
- The first few columns are the same as above, but three extra columns are added at the end of each line for the second, third, and fourth swimmer's takeover reaction time.
RANK ; empty ; --------------- SPLITS;  FINAL;     B1;     B2; B3;   RT1;   RT2;   RT3;   RT4;
1    ;       ;  31.27;  66.68;  97.78; 136.99; 136.91; 136.02;   ;  0.66; -0.10;  0.24;  0.33;
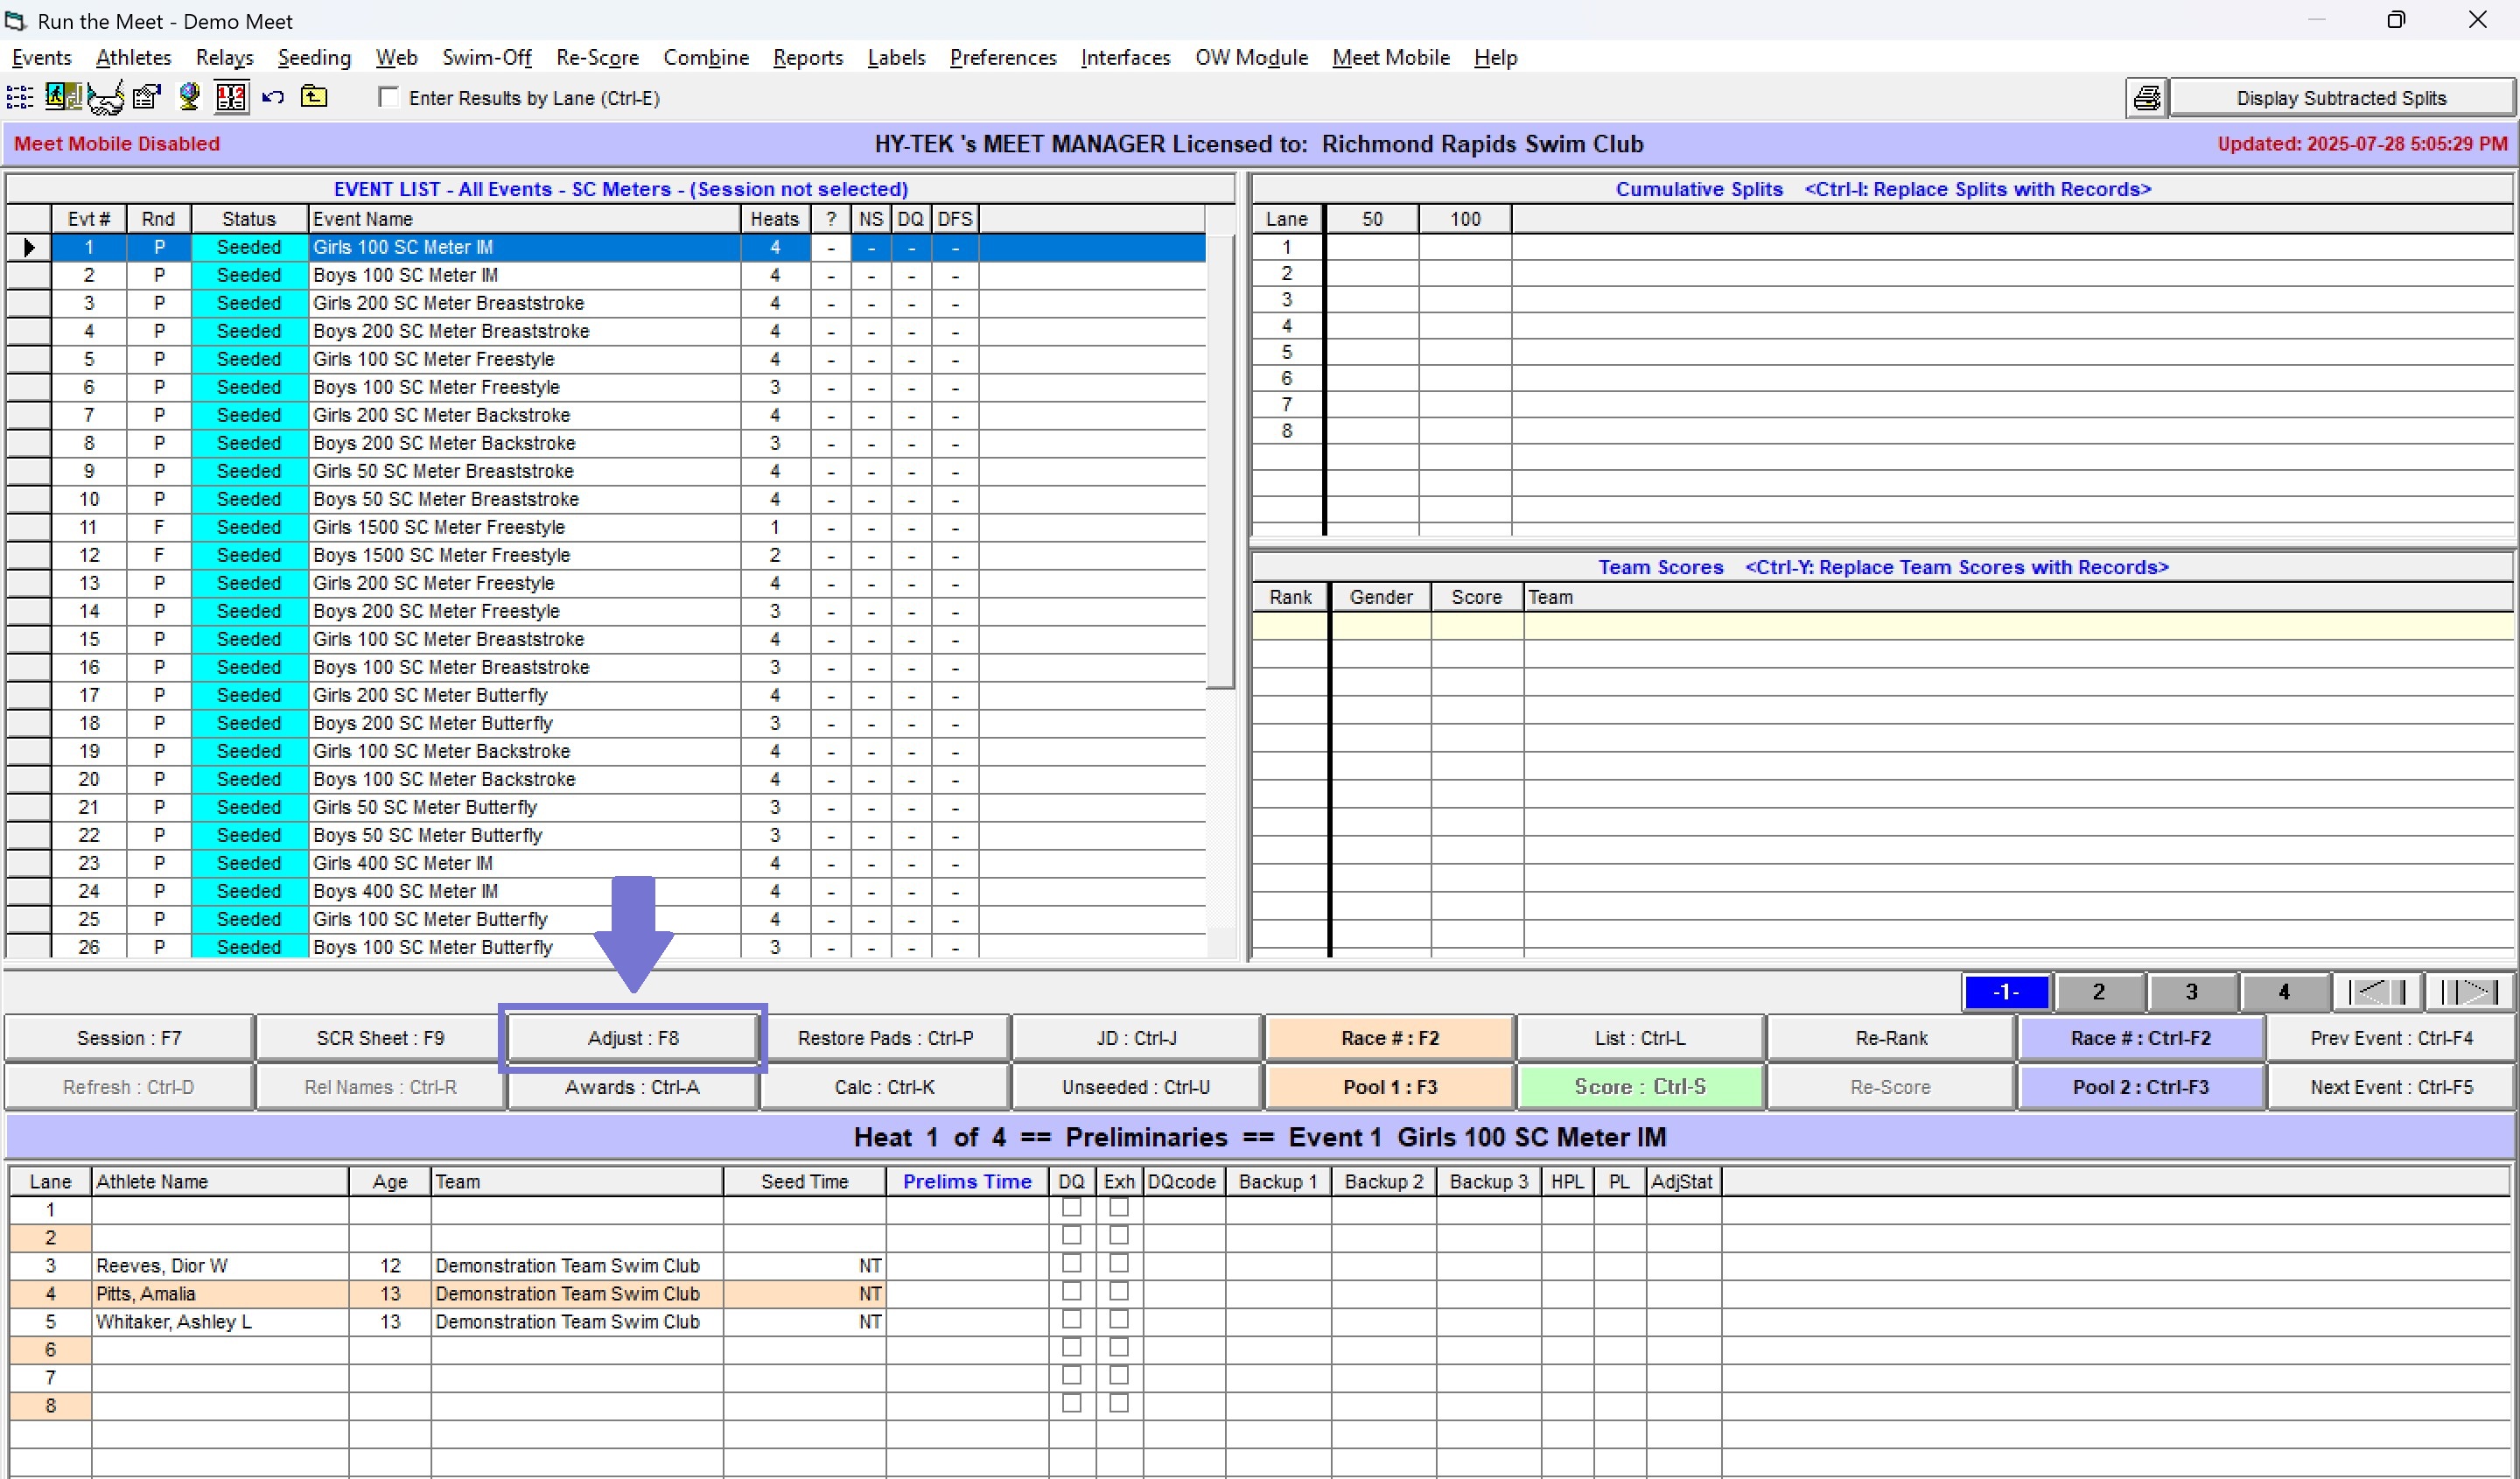
The Adjust Menu: Scratches, Deck Entries, & Changes
From the
Locating the Adjust menu in the Run screen. (Click to collapse image.)
The Adjust menu is organized by heat and lane. You can click
X in the top right corner of the popup window to close, then click Making changes in the Adjust menu (Click to collapse image.)
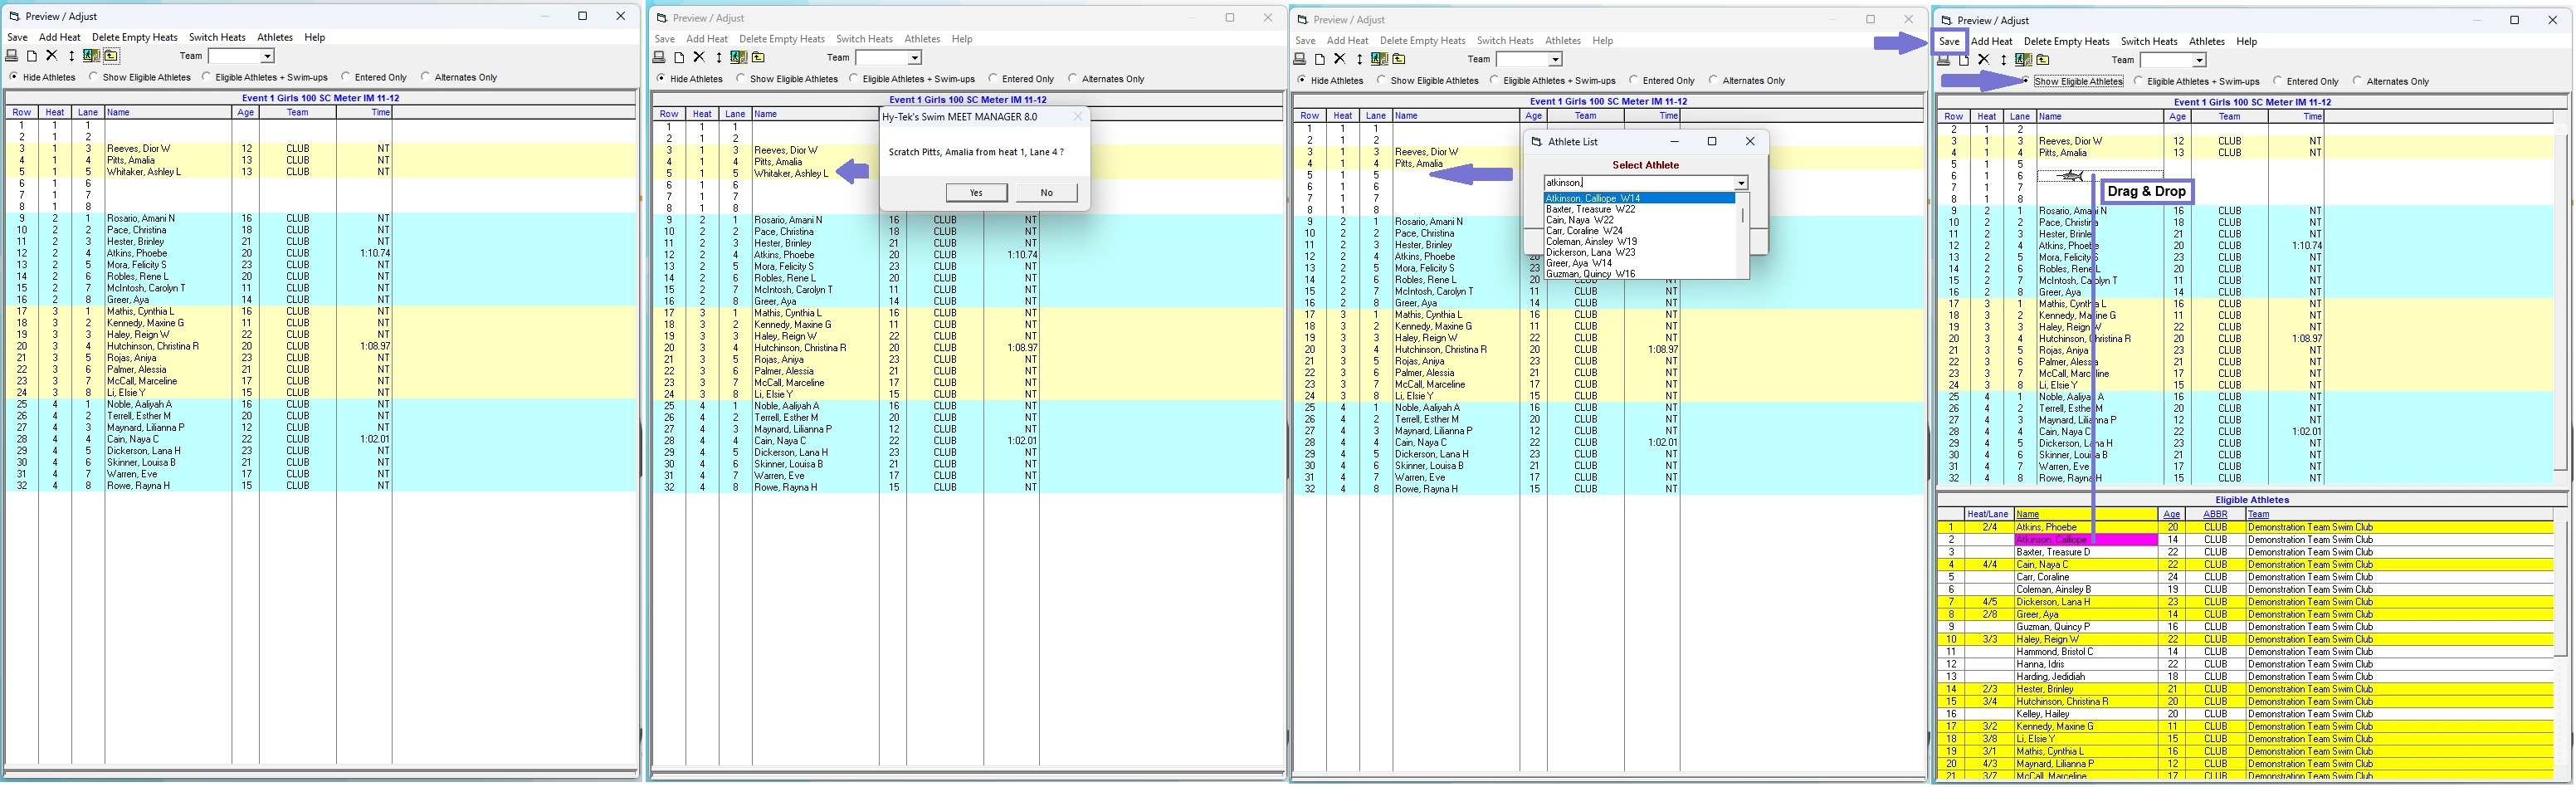
Scratches
To scratch a swimmer, double-click their name. When the popup
Adding a Swimmer & Moving a Swimmer Around (Deck Entries & Name Changes)
Adding a Swimmer to an Empty Lane
Swimmers not already entered in an event can only be added to an empty lane. You may need to remove (scratch) a swimmer previously entered into a particular lane (by double-clicking their name) in order to add a new swimmer to that lane. There are two ways to add a swimmer into an empty lane:
- Double click an empty lane, then begin typing the swimmer's last name. Then, use your
↑ ↓arrow keys to find the swimmer, then hitEnteron your keyboard to accept the change. (Sometimes using your mouse here will make the list options to move around unexpectedly). OR: - Click
Show Eligible Athletes (orShow Eligible Athletes + Swim-ups if the swimmer is from a younger age group). Find the athlete's name in the bottom window (sorted by last name), then drag-and-drop the name into place.
Moving a Swimmer Around
There are two ways to move a swimmer around, similarly to adding a swimmer to an empty lane:
- Double click an empty lane, then begin typing the swimmer's last name. The swimmer will be moved into the new lane.
- Drag and drop the swimmer into the new lane. If there's already a swimmer entered in the new lane, the two swimmers will be swapped.
The Calc Menu: Lanes, Colours, & Adjusting Times
🛈 INFO: A few quick definitions on Backup Times in HyTek MM and this guide. (click to expand section)
- Prelims Time/Finals Time is the final time assigned to the swimmer, and can be changed by using the
Calc menu, or by overwriting the number manually. By default, this is the Primary Time from the timing system (i.e., the touchpad time, or a Calculated Backup time determined by the timing system.) - Backup 1, Backup 2, and Backup 3 correspond to the the backups recorded by the timing system.
- Calculated Backup is the single backup time, the arithmetic mean of two backups, or the median of three backups, if there are one, two, or three backup times available.
- Never take the average of two different kinds of sources (e.g. never average a plunger time with a stopwatch time). Go in descending order based on availability and reliability: automatic (touchpad), semi-automatic (plunger), manual (stopwatch).
- Ensure that two backup times agree with each other before taking the average. Always check your numbers to make sure they make sense with respect to the event (e.g. no 12-second 1500 FR's) and the order of finish.
- If there is a Chief Judge Electronics (CJE), never make a decision without consulting the CJE. If there is no CJE and you are working in the capacity of the Chief Recorder, make decisions in accordance with World Aquatic Rules SW II-2.11 (Chief Recorder) and SW II-11 (Timing).
To open the Calc menu, click the Calc : Ctrl-K button, or click the right-most column of the lane viewer on the bottom part of the Run screen. (Click to collapse image.)
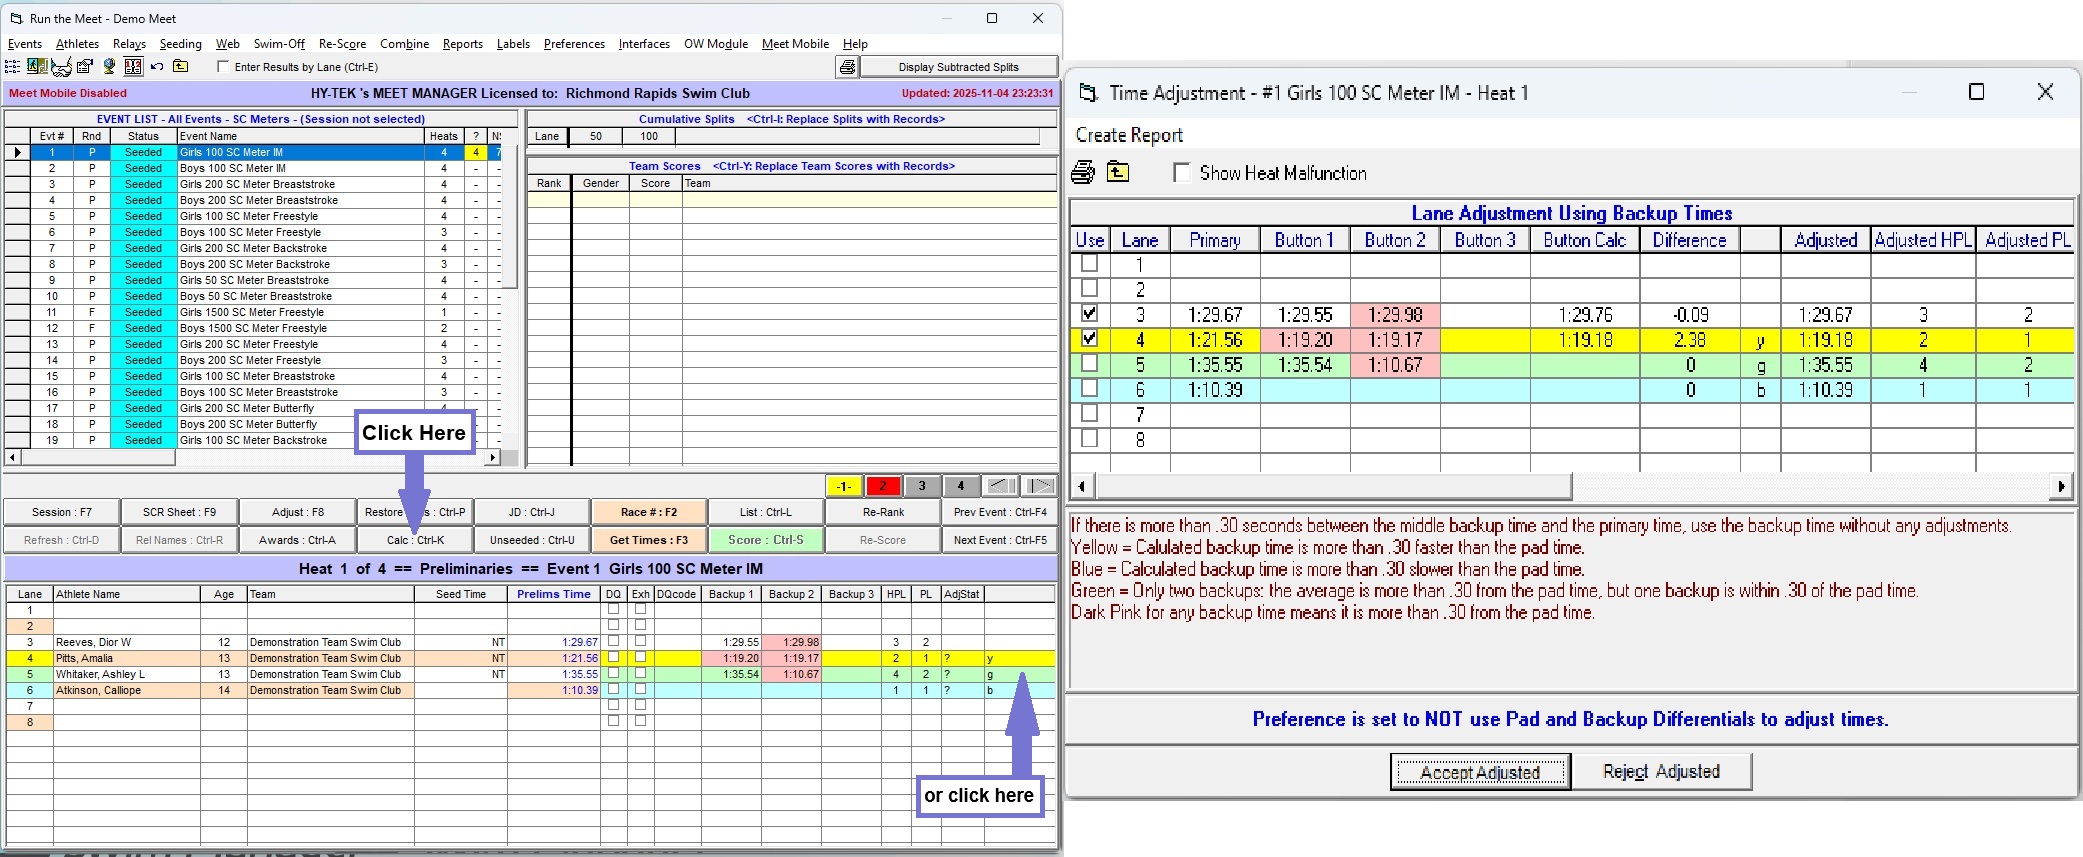
In our example above, we can see four colours:
- Lane 3 appears white, with Button 2 highlighted in RED. This means that Button 2 is ≥0.30s different from the Primary time.
- Lane 4 appears YELLOW. This means the Calculated Backup is ≥0.30s faster than the Primary time. Here, it is likely that there was a touchpad malfunction, and in the absence of a CJE's instruction otherwise, we decide to fall back onto the backup times.
- Lane 5 appears GREEN. We can see that one plunger agrees with the touchpad, but the average of the two plungers ismore than 0.3s off, because one plunger is 25 seconds faster. In the absence of more information from a CJE, we can assume that one plunger was triggered early.
Click the? in theAdjStat column to change it to ak , which will remove warnings from theEVENT LIST (under the? column) and Heats browser (red highlighted heat number). - Lane 6 appears BLUE. We can see that we have a Touchpad time but no backups. Unless the touch was judged to be good by a CJE, we would need more information (e.g. a manual stopwatch time).
When we go into the
- If the row is white (Calculated Average is ≤0.30s different from Primary Time), the Adjusted time will be the same as the Primary Time, regardless of if "Use" is checked.
- If the row is YELLOW, the Adjusted time will be the Calculated Backup if "Use" is checked (default), or will fall back to the Primary time if "Use" is unchecked.
- If the row is GREEN, the Adjusted time will be the Primary Time if "Use" is unchecked (default), or will be the Calculated Backup if "Use" is checked.
- If the row is BLUE (no backups), the Adjusted time will be the same as the Primary Time, regardless of if "Use" is checked.
Check and uncheck the "Use" rows as desired. Verify that backup times agree and make sense. When you click
Colour Coding for Lanes & Backups
| Colour | Touchpad Time | Backup 1 | Backup 2 | Backup 3 | Colour Meaning | Likely Explanations | |
|---|---|---|---|---|---|---|---|
| White Row, 1 Red Cell | 1:29.67 | 1:29.55 | 1:29.98 | ---- | Backup Time is more than 0.30s away from Touchpad Time | One plunger was off, Pad and other plunger were OK. |
|
| White Row, 2 Red Cells | 1:30.78 | 1:25.20 | 1:36.36 | ---- | Backup Time is more than 0.30s away from Touchpad Time | If 2 Red Cells: two plungers were very different from each other AND Pad, and "Pad" time was likely the average of two plungers. Need to find a third backup time to decide what time to assign swimmer. | |
| Yellow (y) Row | 1:21.56 | 1:19.20 | 1:19.17 | ---- | Average of backups is more than 0.30s faster than Touchpad time | "Soft Touch": plungers are OK, Touchpad time was late. | |
| Green (g) Row | 1:35.55 | 1:35.54 | 1:10.67 | ---- | Average of backups is more than 0.30s away from touchpad time, but one backup agrees with touchpad time. | One Plunger went early or late; Pad and other plunger were OK. | |
| Blue (b) Row | 1:21.56 | ---- | ---- | ---- | Average of backups is more than 0.30s slower than Touchpad time | Either: (1) someone triggered the touchpad before the swimmer touched the wall; (2) both Timekeepers fell asleep and forgot to hit the Plungers until it was too late; or, (3) No backup times were recorded. |
Processing DQs
Processing a DQ. (Click to collapse image.)
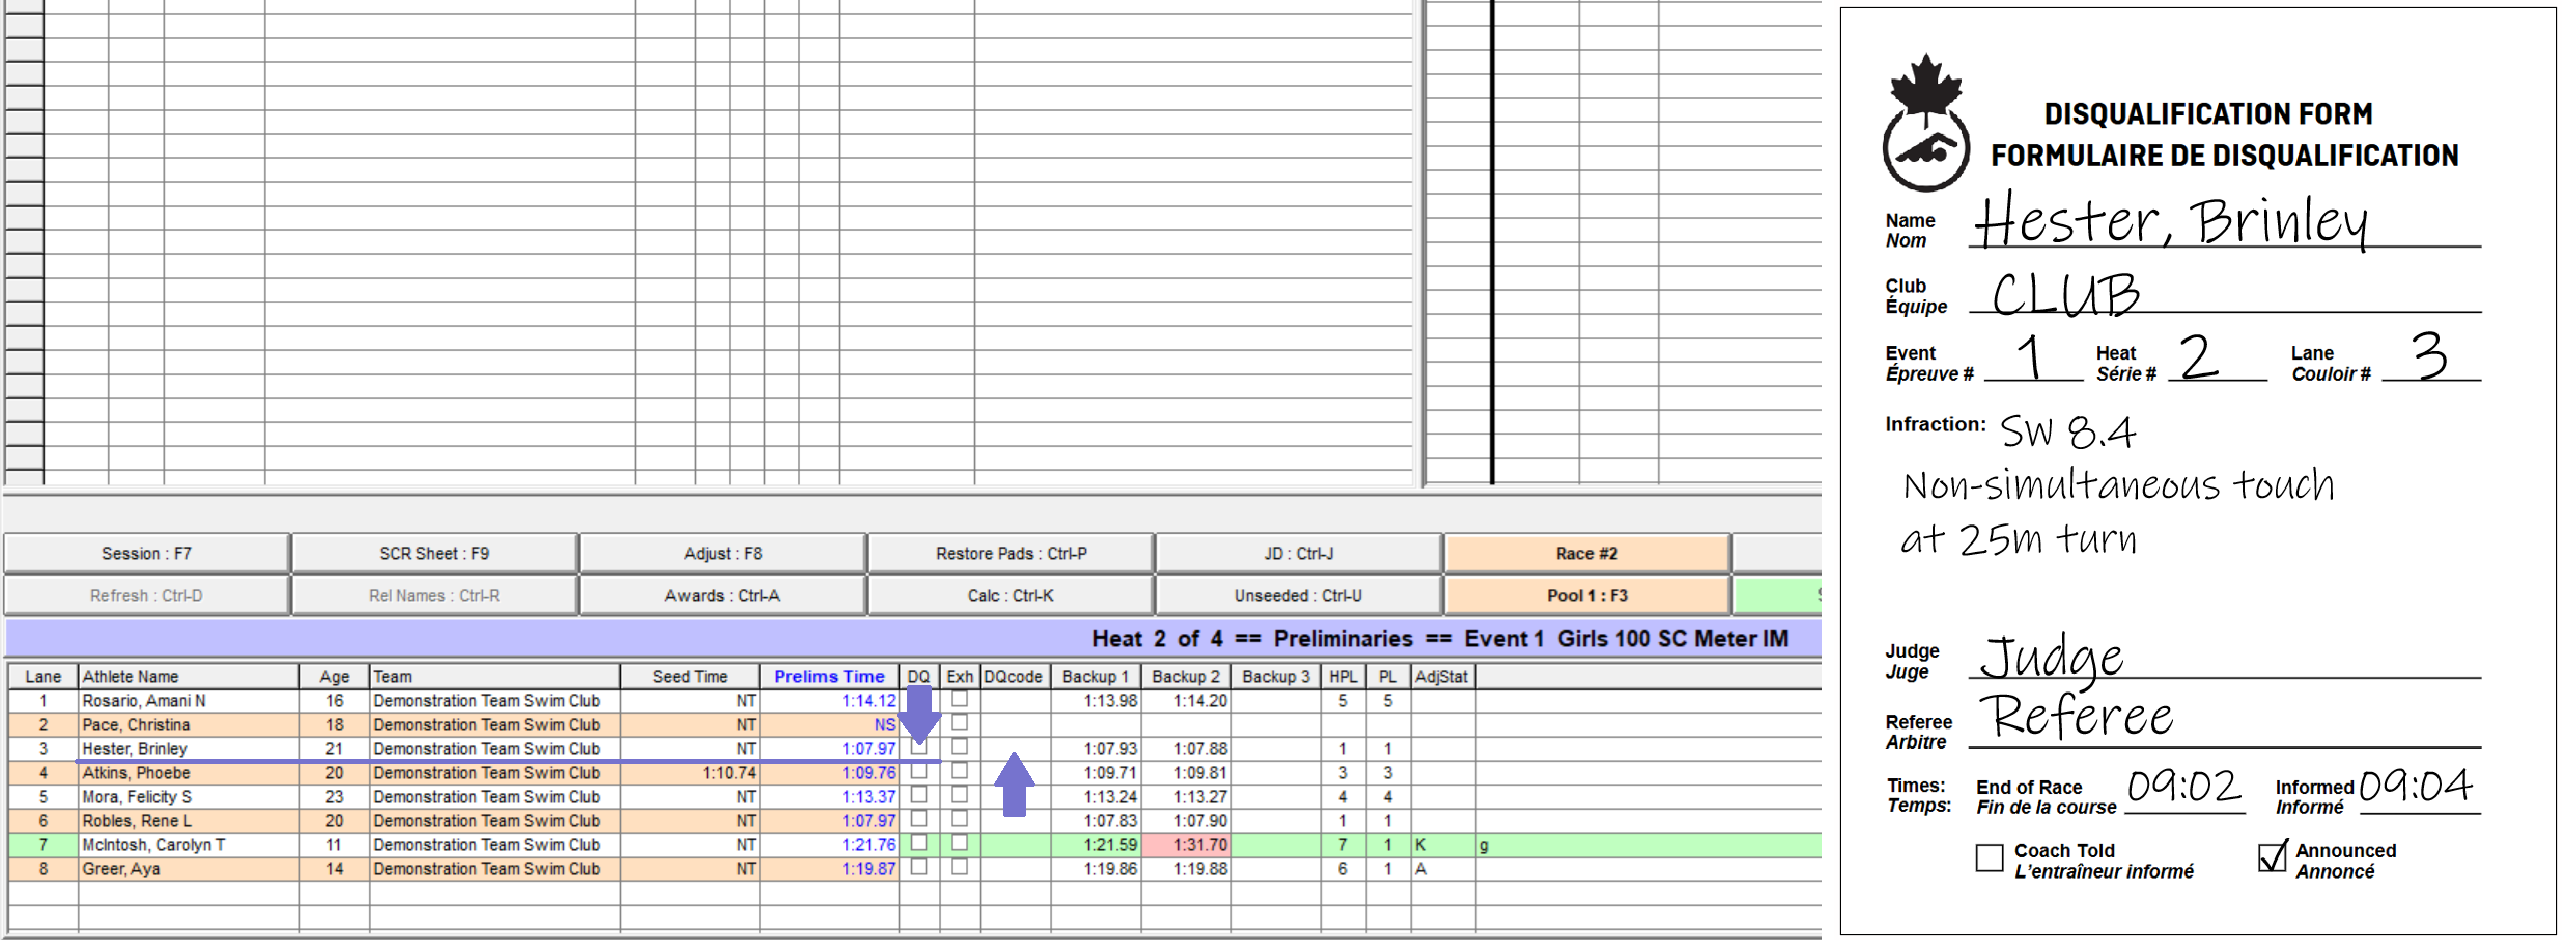
- First, verify that the DQ slip has been processed correctly: all necessary fields have been completed, and informed information is completed (Announced/Coach Told).
- In the
EVENT LIST , click your Event, then go to the correct heat. - Check that the name, club, event, heat, and lane of the swimmer in the software matches the information on the DQ slip.
- Check the checkbox
☐ under theDQ column, corresponding to the correct swimmer. - If desired, enter a DQ code by clicking the box under the
DQcode column, then selecting corresponding code from the dropdown list. - More information about setting up DQ codes can be found in the Setting Up DQ Codes section.
- For Relay DQs involving a non-takeover infraction committed by a swimmer (i.e. a Stroke or Turn infraction), select one of
6A,6B,6C, or6D, as appropriate. Click to the side to complete the selection, then when the popup appears, select the code corresponding to the infraction the swimmer committed. - For Relay DQs, ensure you remove any intermediate splits that were recorded after an infraction occurred. i.e., if the 2nd swimmer committed a stroke infraction, take out splits 2 and 3; if the 3rd swimmer commmitted an infraction, take out split 3.
- To remove splits, navigate to the
Splits window in the top right of theRun screen. Ensure you are viewingCumulative Splits (if not, click theDisplay Cumulative Splits button in the top right). Click the corresponding split, then pressBackspaceorDeleteon your keyboard to delete. - Move to the next heat (or click the Next Heat arrow). In the
EVENT LIST , the number under theDQ column for the event should increment by 1.
Processing an Official Split Request
Creating the Official Split Event
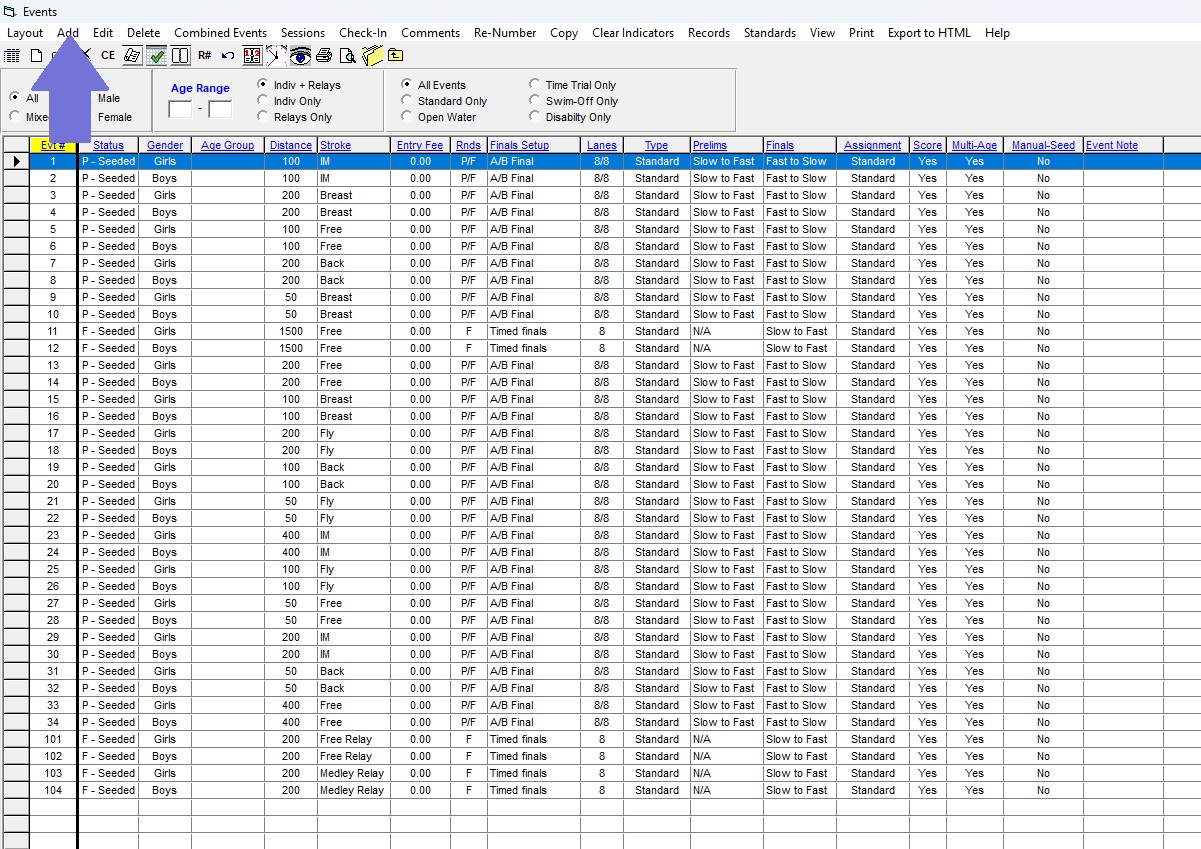
Navigating to the Events Menu. (Click to collapse image.)
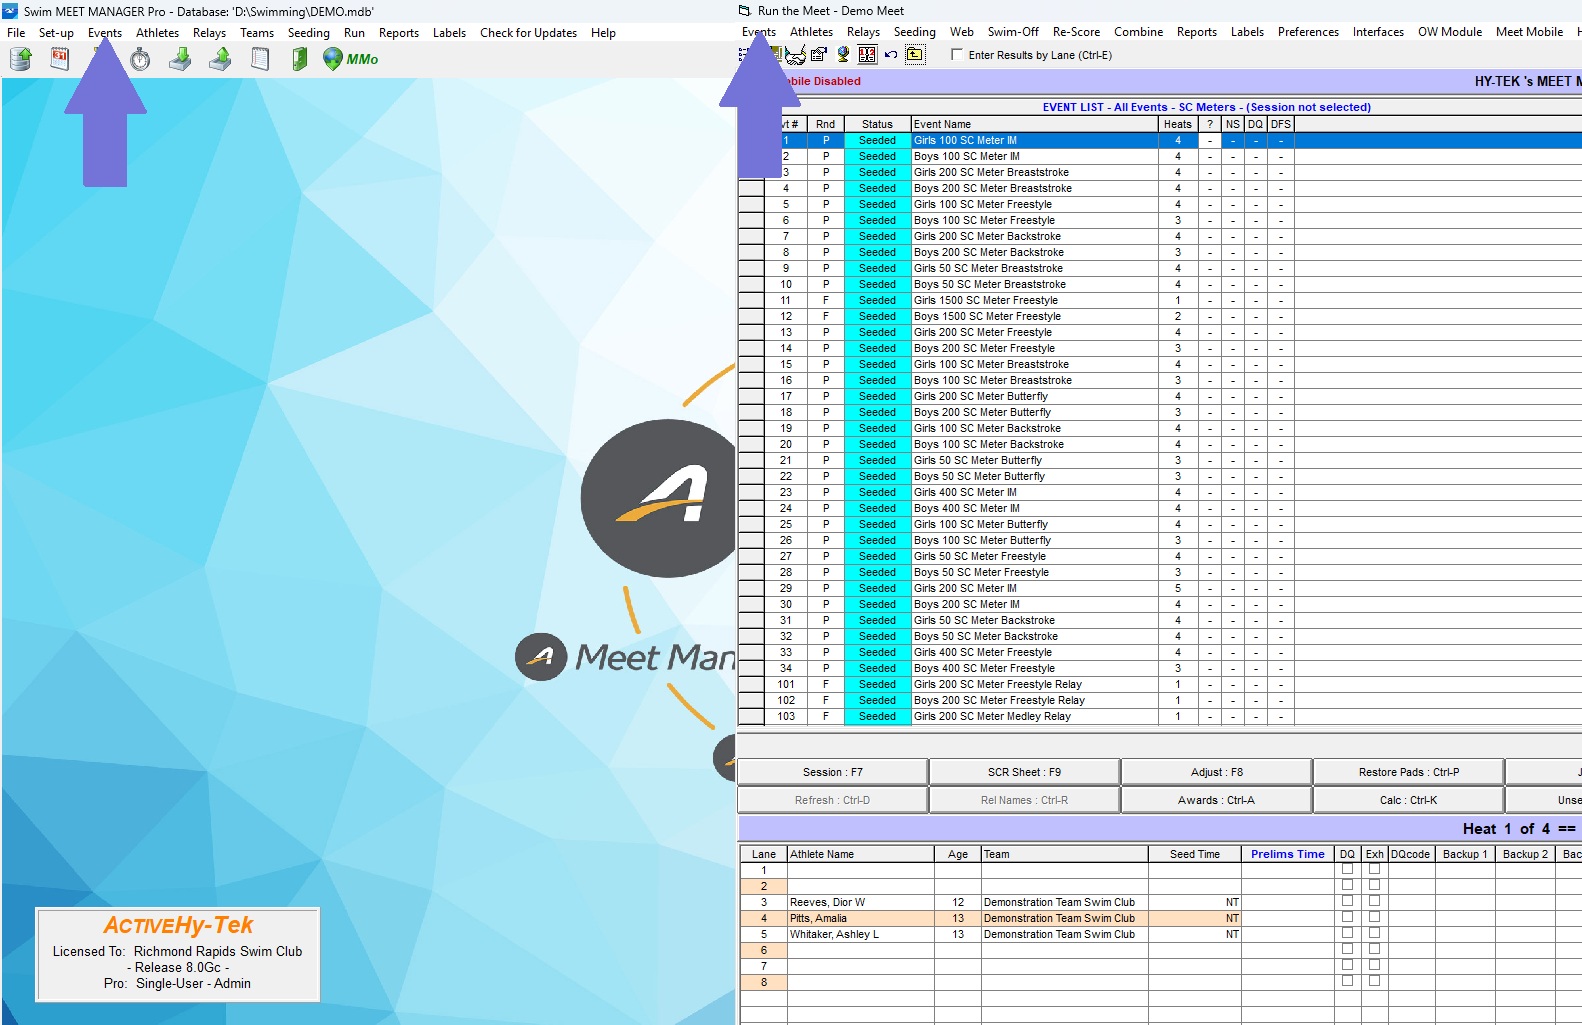
- From the Home screen or the
Run screen, clickEvents in the top bar to open theEvents menu. - Click
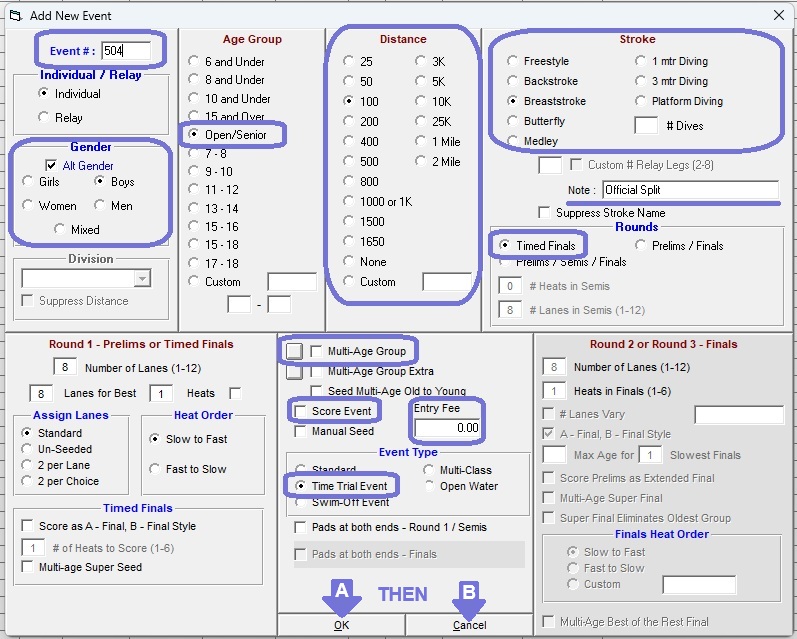
Add to create a new event. - Enter an
Event # , then setIndividual / Relay to🔘 Individual . - Select the
Gender , and set theAge Group to🔘 Open/Senior . - Choose the
Distance andStroke to the distance and stroke of the Official Split request. - Optionally, enter a note in the
Note : field. This text will display in the Event Title on Programs and Results. - Set the
Rounds to - Ensure
☐ Multi-Age Group and☐ Score Event are unchecked. - Set the
Entry Fee to0.00. - Set the
Event Type to🔘 Time Trial Event . - Click
OK once (theEvent # should automatically increment by 1), then clickCancel . - Before closing the
Event menu, follow the steps below to add the Event to a Session.
Creating a new Event in the Events menu. (Click to collapse image.)
Configuring an Official Split Event. (Click to collapse image.)
Adding the Official Split Event to a Session
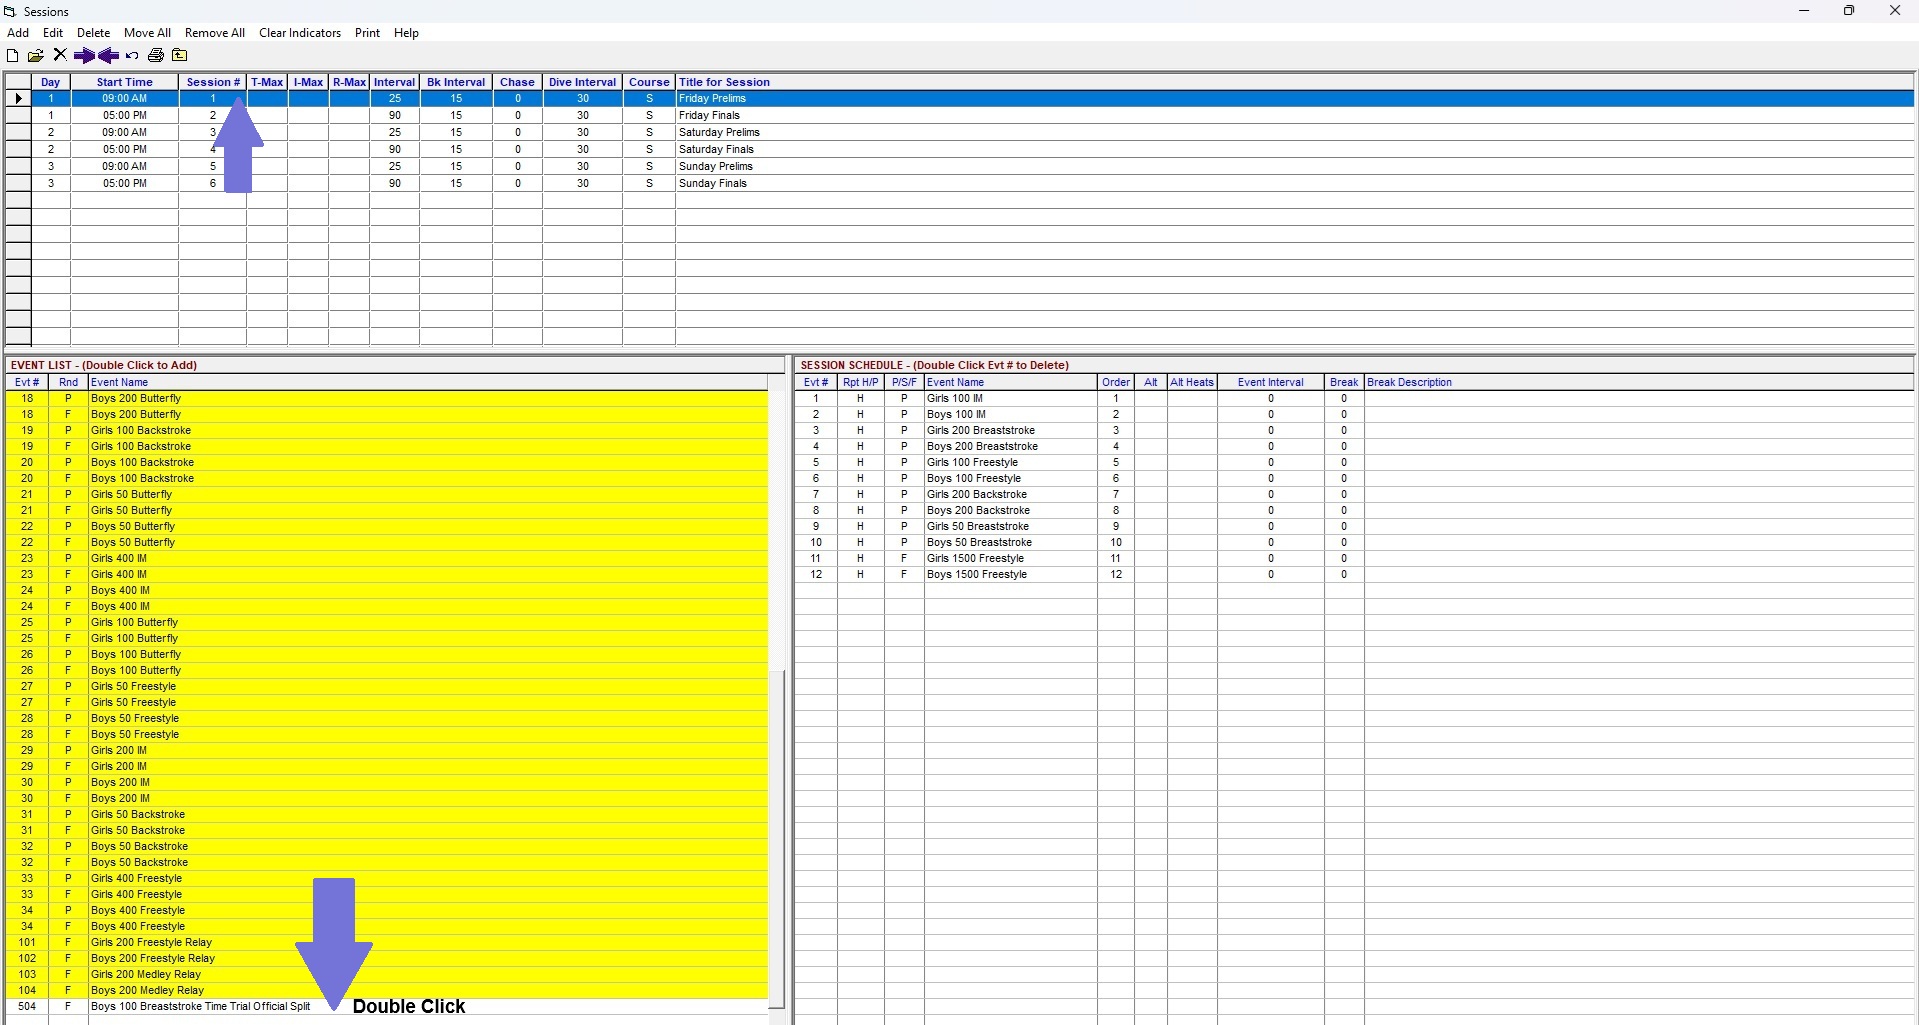
Navigating to the Sessions Menu. (Click to collapse image.)
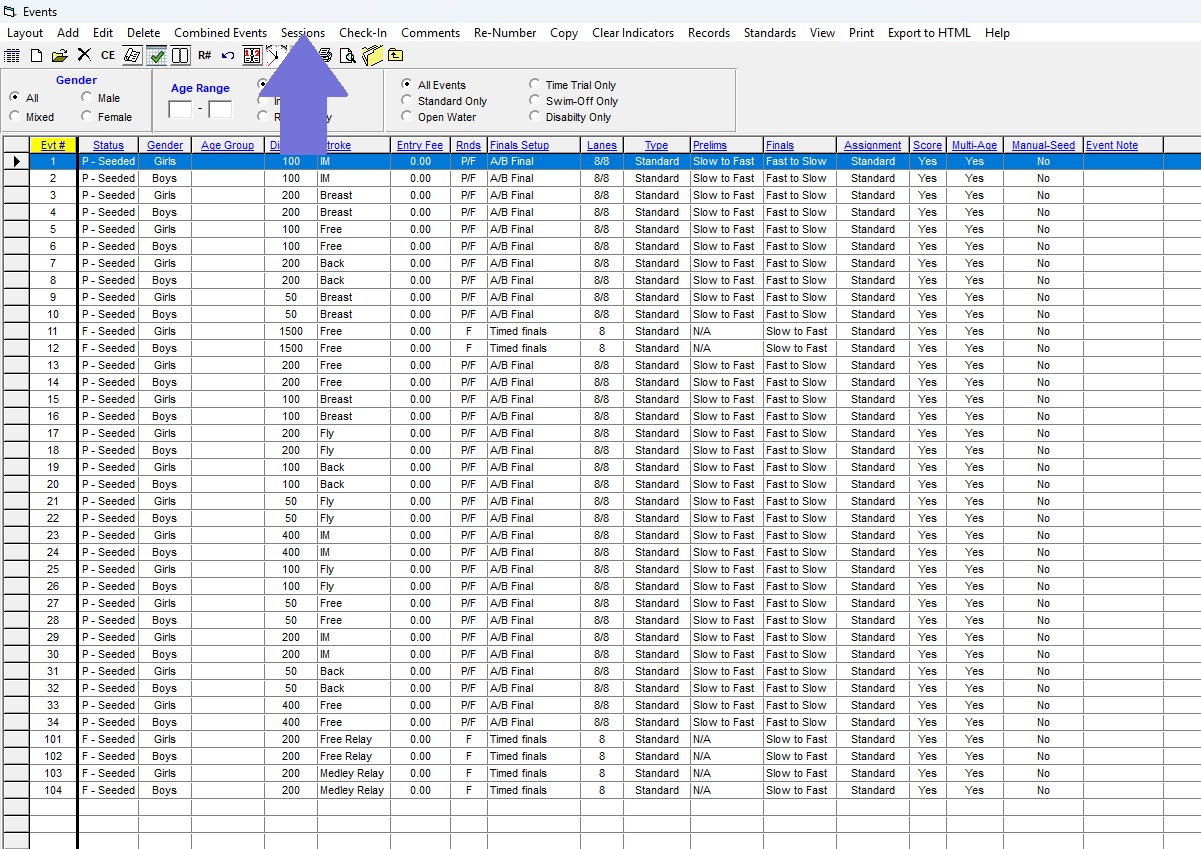
- From the
Event menu, clickSessions in the top bar to open theSessions menu. - In the Sessions list at the top, click your desired session.
- Scroll to the bottom of the
EVENT LIST . Find your Official Split event. - Double-click the Official Split event to add to the
EVENT LIST . - Close the
Sessions menu, then close theEvents menu. In theRun screen, you should be able to see your newly-created Official Split event in the Session you just selected.
Adding an Event into a Session using the Sessions Menu. (Click to collapse image.)
Adding Swimmers & Results to an Official Split Event
Adding a Swimmer: See Adding a Swimmer & Moving a Swimmer Around.
Adding Times: Type the time in manually.
OR: Ask your Electronics Operator if they can copy the results over electronically. If they can, use the

Processing Relay Name Changes: The Relay Names Menu
Navigate to the
Navigating to the Relay Names Menu. (Click to collapse image.)
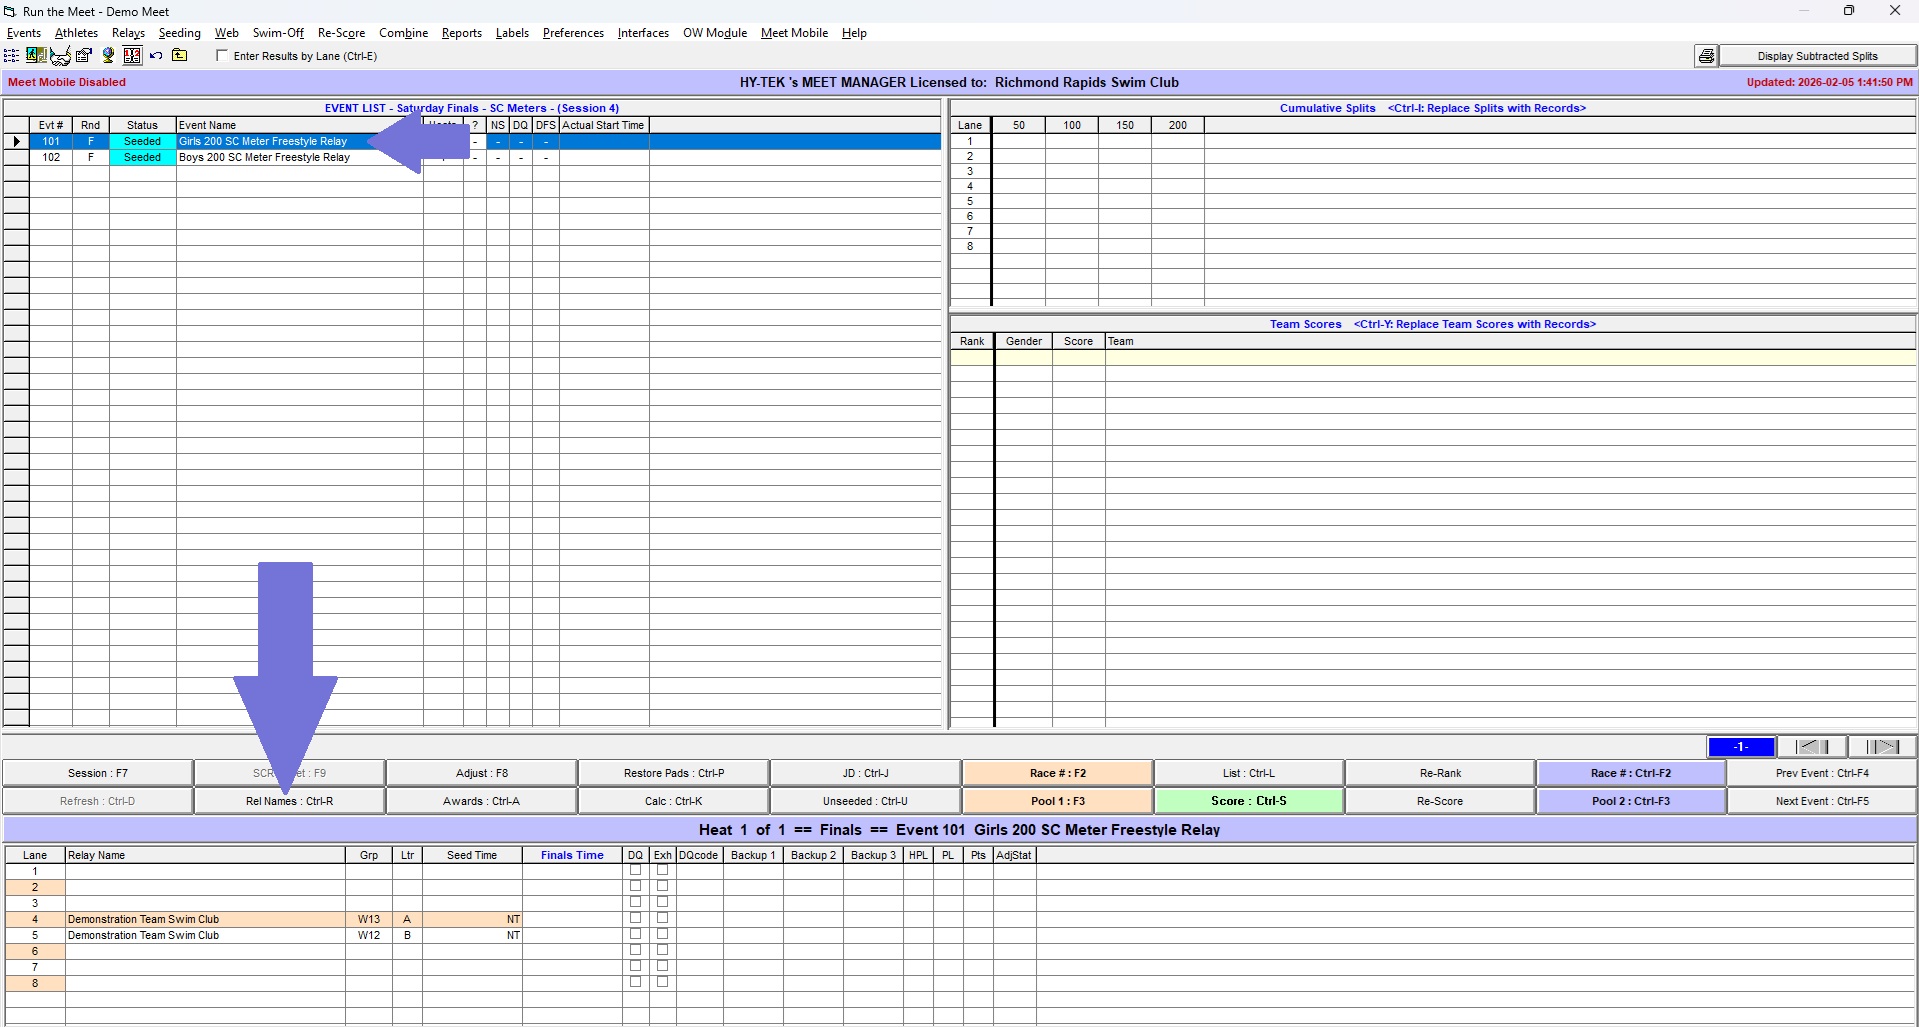
- The
Relay Teams menu shows one heat of relays at a time, sorted by lane. - You can move betweeen heats using the
◀ and▶ buttons - Select a Relay Team from the
Relay Teams menu. - Drag and drop OR double click the corresponding name from the
Eligible Athletes menu to add it to theRelay Order menu. - If there is a younger swimmer "swimming up" into an older Relay Age Group, you may need to check the
☐ Show Swim-ups checkbox. - You can swap two swimmers by dragging and dropping names within the
Eligible Athletes menu. - You can double-click a swimmer already in the
Eligible Athletes menu to remove them.
Adding a Relay: The Relays Menu
Running Swim-Offs
In theClick to collapse image.
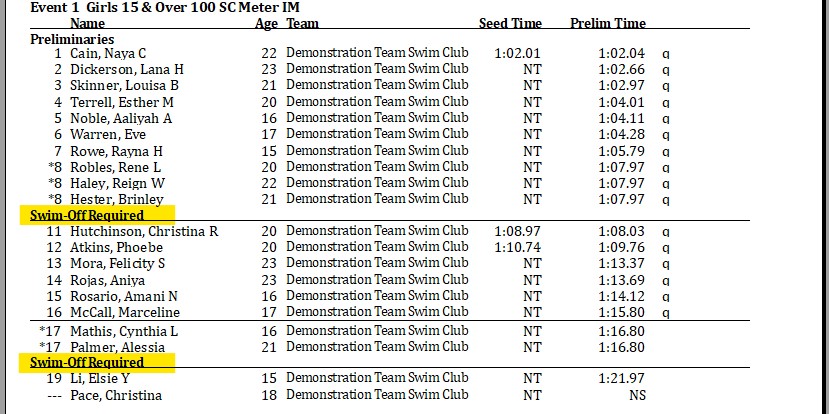
- When prompted to "Create Swim-Off?", click
Yes . - When prompted to "Change event number?", click
No . - Choose the swimmers involved in the Swim-Off tie.
- Use the
Adjust : F8 button to adjust seeding according to given instructions.
Click the
- When prompted to "auto break ties based on swim-off results", click
Yes . - When the
Judges Decision / Tie Breaker window appears, verify the new placing, then clickOK . - Click the
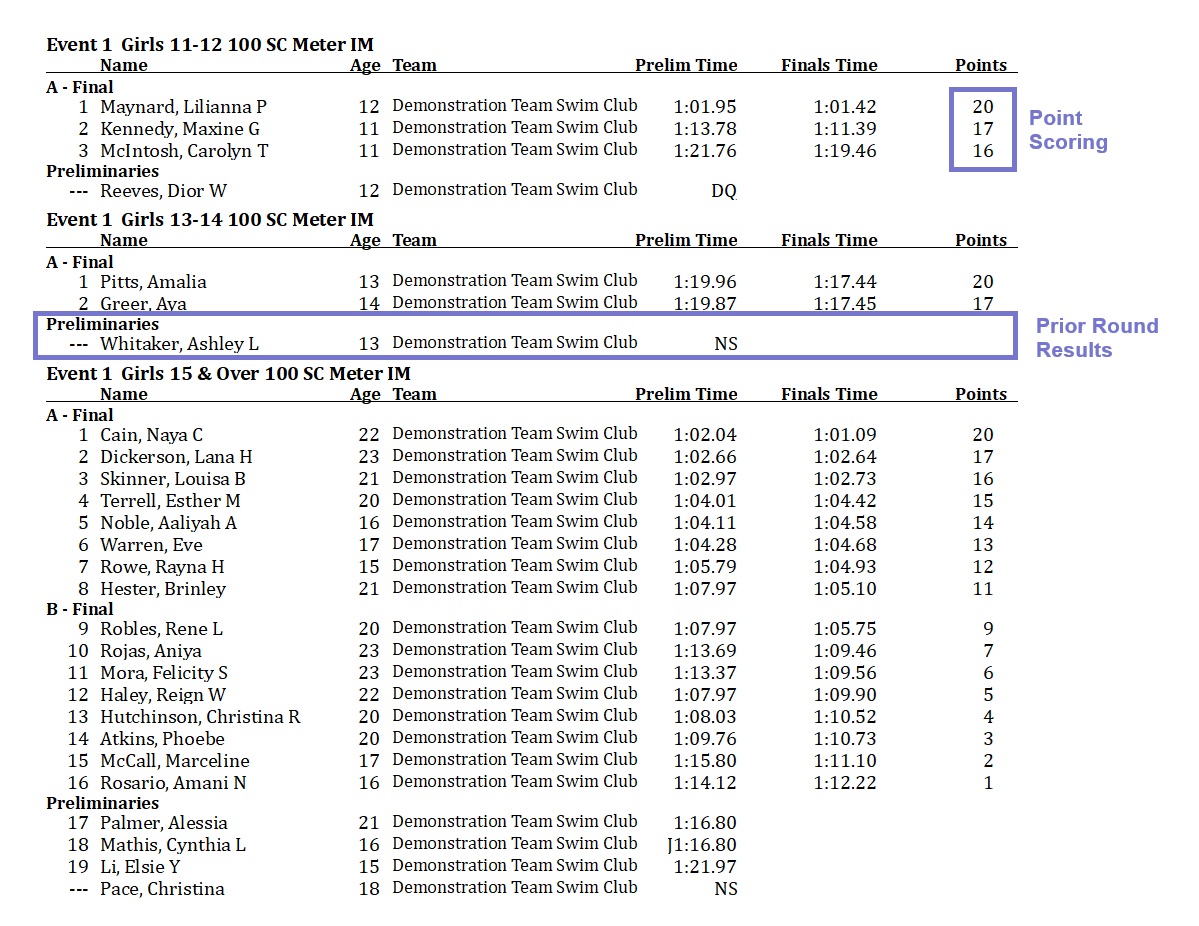
List button to generate a Result report with the tie-broken ranking. The JD placing is indicated by aJnext to the original (Prelims) swim time.
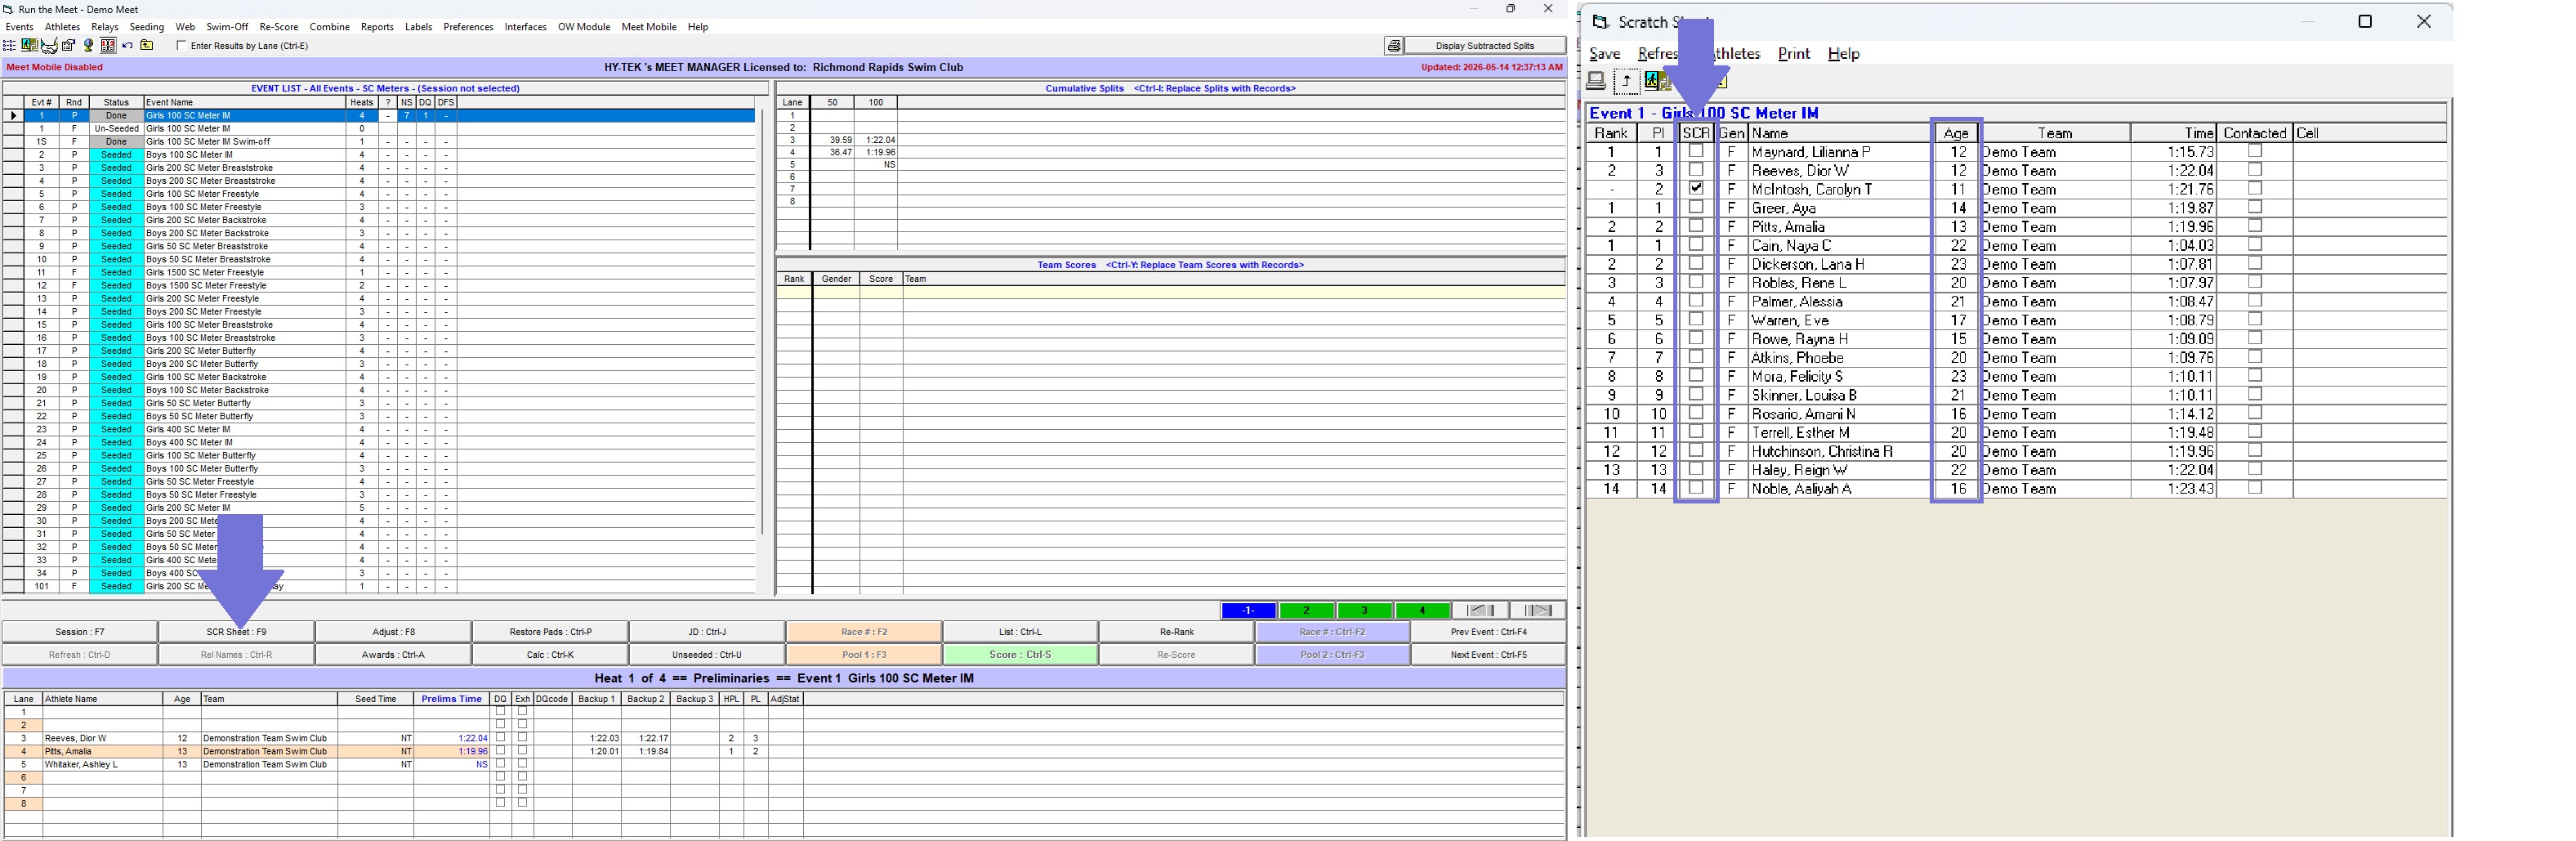
Processing Finals Scratches
- Click the
SCR Sheet button to open theScratch Sheet window. - To Scratch a swimmer from Finals, click the
☐ checkbox under theSCR column. - Click the
Save button at the top left of theScratch Sheet window to save your changes.
Scratching Swimmers from Finals using the SCR Sheet Menu (Click to collapse image.)
X in the top right corner of the popup window to close, then click 
Seeding, Re-Seeding, and Finals Seeding
The Seeding process is mostly identical for Timed Finals, Prelims, and Finals events, as long as Seeding is correctly set up in theThe Seeding Menu (Click to collapse image.)
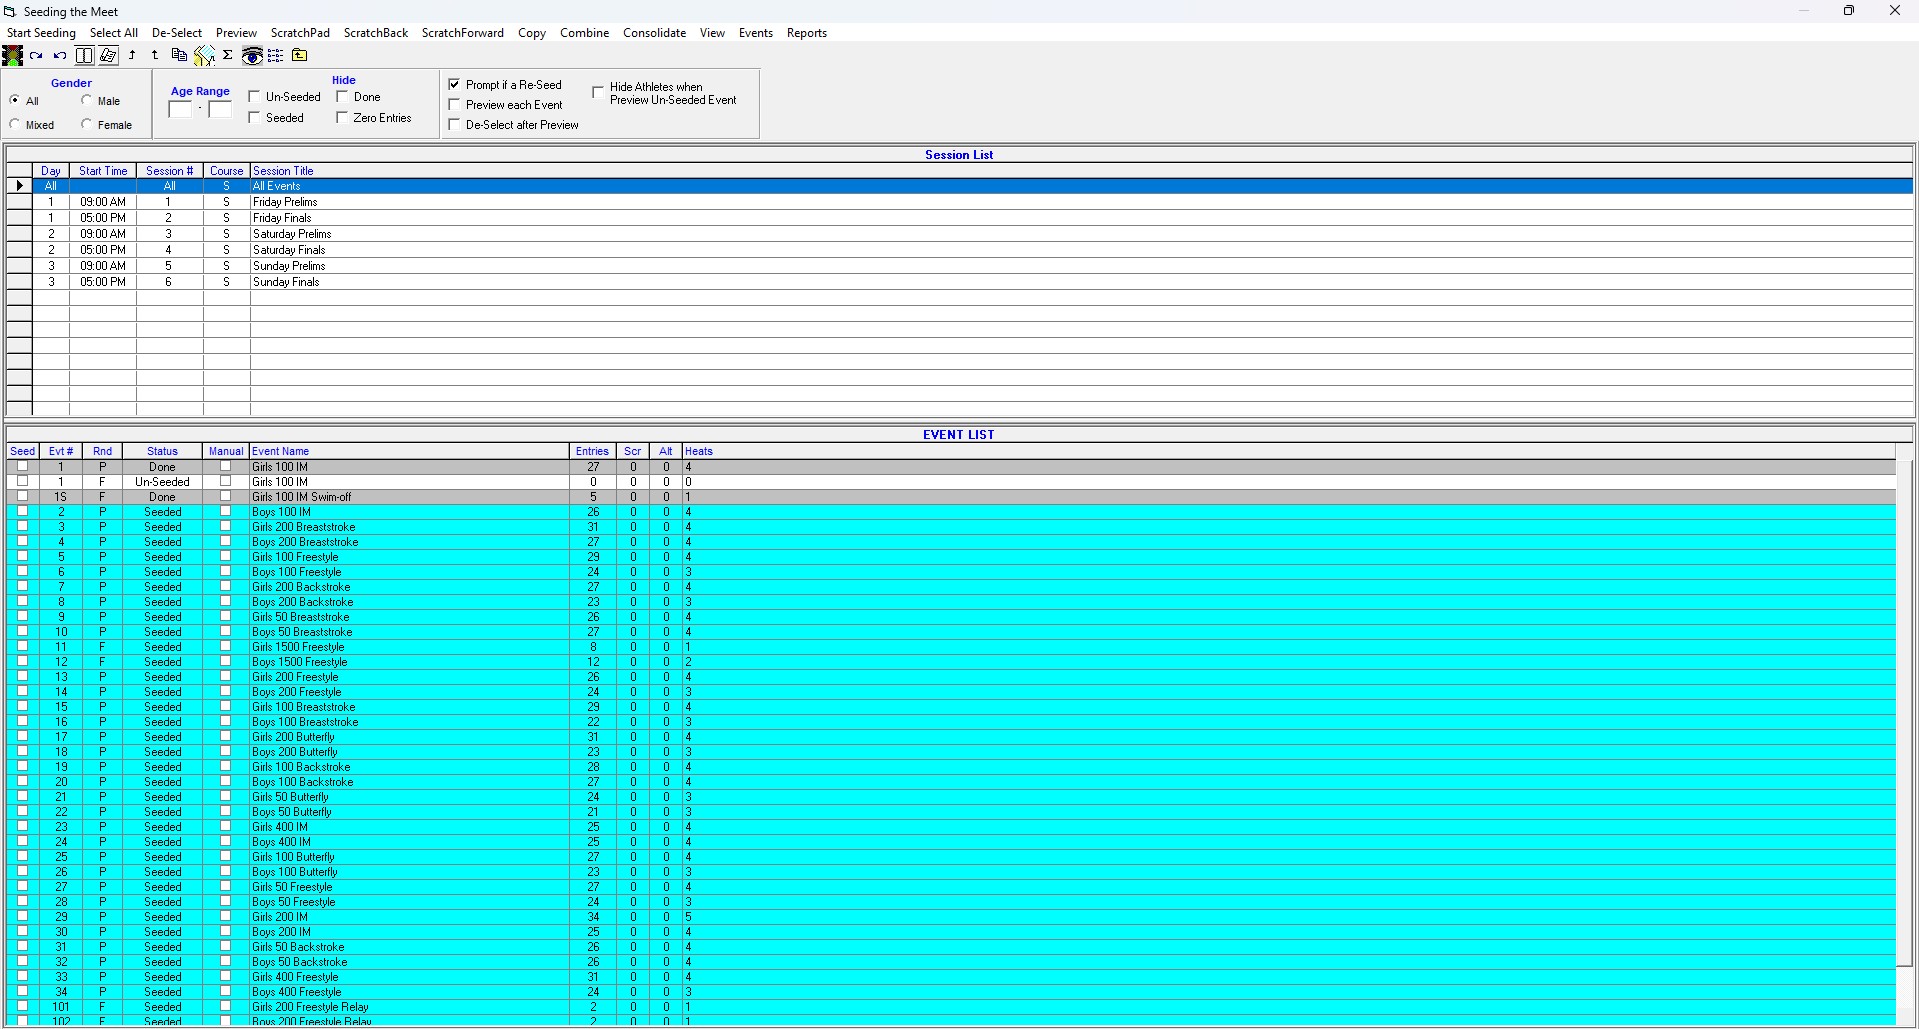
- At the top of the Seeding window, in the
SESSION LIST , select the session in which the event will be swum. - In the
EVENT LIST , Check the☐ checkbox under theSeed column for all and only the events you would like to seed in that session. - Click
Start Seeding in the top-left corner (or click the 🚦 Traffic Light button) to start seeding. - Once the
Seeding Completed ! pop-up appears, clickOK .
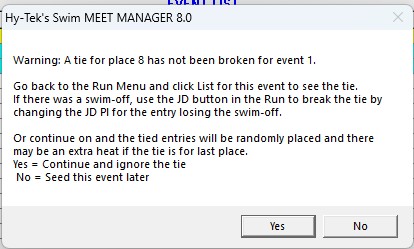
Attempting Seeding with Outstanding Swim-Offs (Click to collapse image.)
Moved Swimmers & Combined Heats: Pulling By Race Number
Alternatively known as: Swimming "Two Heats" in the Water at the Same Time
I know the title's a bit confusing, so here are some example scenarios where the following instructions apply:- The slowest heat of Girls 1500FR has 4 swimmers, and the slowest heat of Boys 1500FR has 3 swimmers, so these two heats swim together in the water to save time.
- A Girl misses the Girls 100FL due to an Official's error and swims in Heat 1 of the Boys 100FL.
- A Boy misses the Boys 100FL due to an Official's error and swims in Heat 1 of an 100FR event.
- Para-Swimmers swim Integrated during Prelims, but their times need to go into a separate Para event so it can be seeded separately for Finals.
- Unmoved swimmers are swimmers who swam where they were originally entered: i.e., they were originally entered in Event 1, Heat 1, and the Timing System recorded their time in Event 1, Heat 1.
- Moved swimmers are swimmers who did not swim where they were originally entered: i.e., they were originally entered in Event 1, Heat 1, but the Timing System recorded their time in e.g. Event 2, Heat 1. Their times must be moved back into Event 1 in HyTek in order to be credited with the correct Race/Stroke/Distance swum.
- Navigate to Event 1 in the
EVENT LIST . Use theAdjust : F8 button open theAdjust menu, then move the moved swimmer into a new heat with only the moved swimmers. Use theAdd Heat button at the top of theAdjust menu as needed. - If Event 2, Heat 1 had boys in lanes 3/4/5 and Ashley in lane 7, then create a new heat in Event 1 with only Ashley in Lane 7.
- If Event 2, Heat 1 had boys in lanes 3/4/5, and Ashley and Charlie in lane 7 and 8, then create a new heat in Event 1 with Ashley in lane 7 and Charlie in Lane 8.
- Navigate to Event 2 in the
EVENT LIST , then navigate to Heat1 in the Heats bar. Pull times for Event 2, Heat 1 as normal using the[Name] : F3 or[Name] : Ctrl-F3 buttons. - When the
Download Alert pop-up appears, sanity-check the times under thePad Time column. Write down the Race Number in theReceived Race # line, then clickAccept . - Times that do not match with a name will be ignored. Names that do not have a time will be marked as NS.
The Download Alert pop-up. (Click to collapse image.)
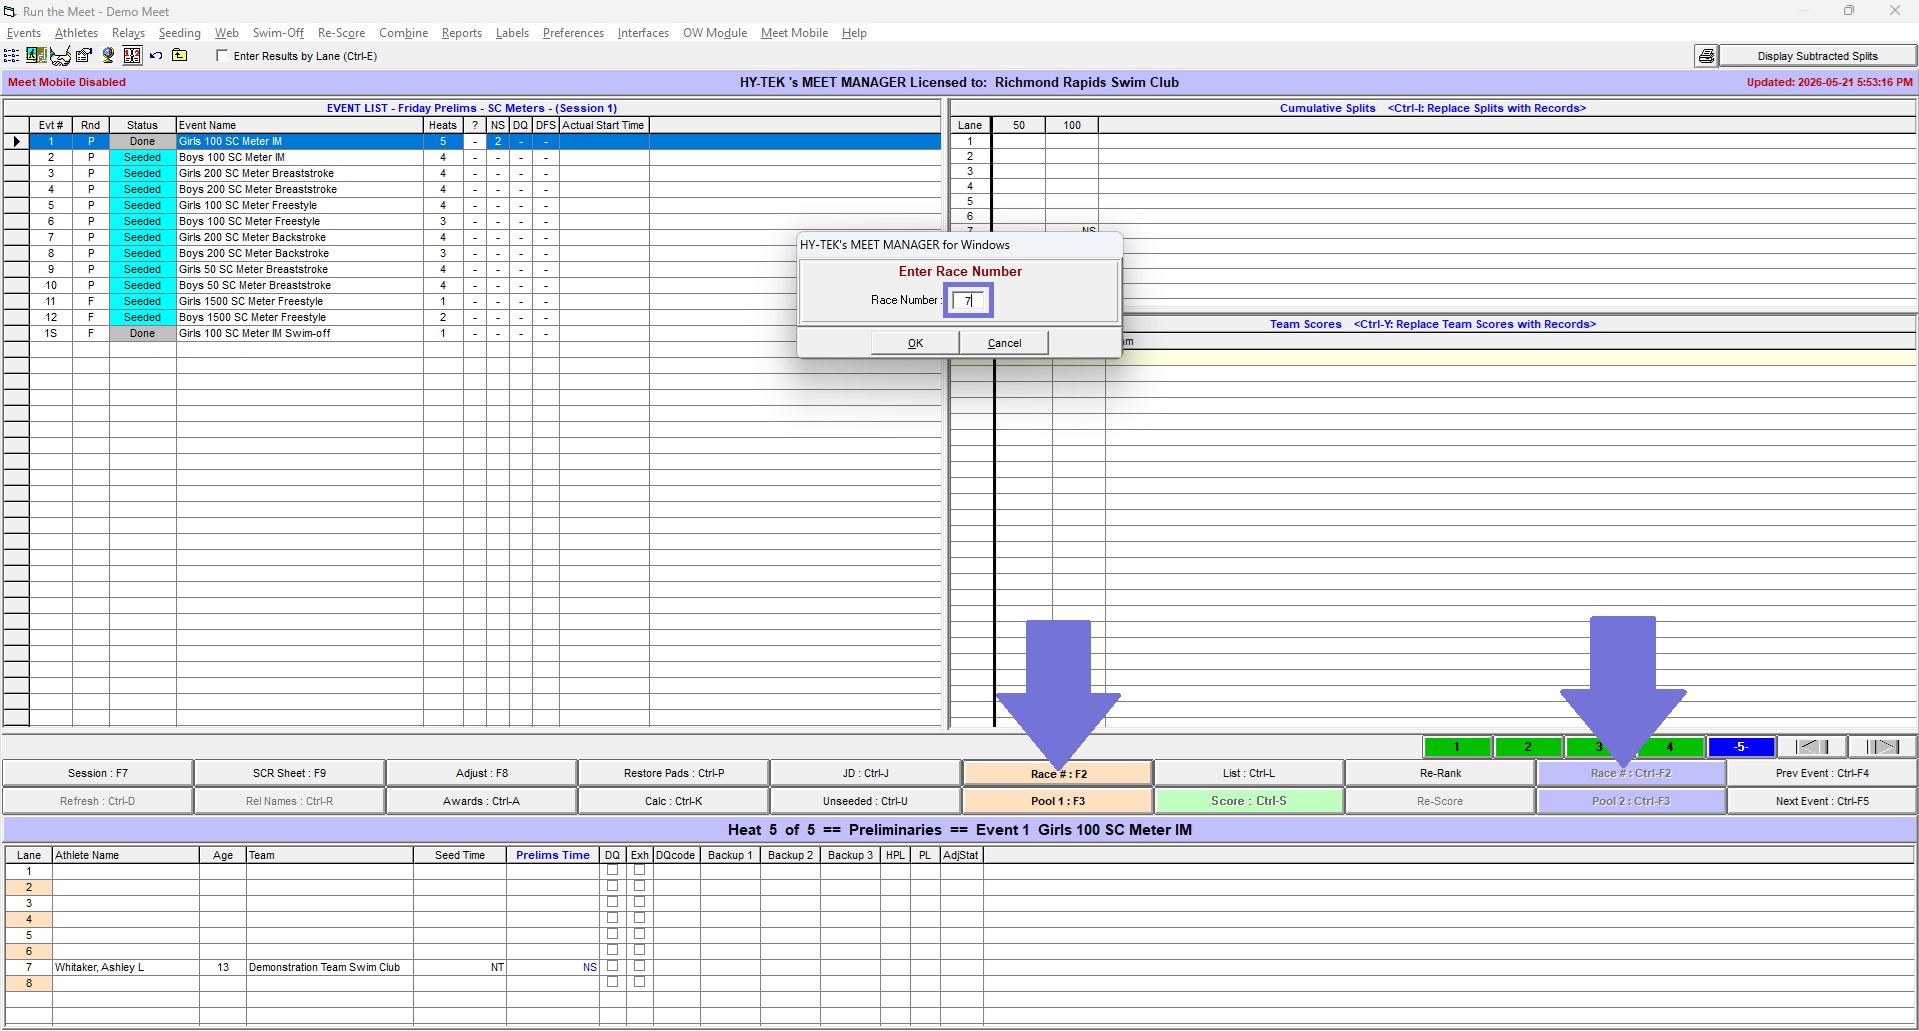
- Navigate to Event 1 in the
EVENT LIST , then click theRace # : F2 orRace # : Ctrl-F2 button for the corresponding Timing Interface. - When the
Enter Race Number pop-up appears, type in the Race Number you wrote down from Step 2, then clickOK . - When the
Download Alert pop-up appears, sanity-check the times under thePad Time column. Write down the Race Number in theReceived Race # line, then clickAccept . - Times that do not match with a name will be ignored. Names that do not have a time will be marked as NS.
- If you see a
Warning: The Times Data [...] pop-up, clickYes . - Congratulations, your times are now in the correct event!
Pulling by Race Number. (Click to collapse image.)
The Times Already Pulled pop-up. (Click to collapse image.)

🛈 Swimming Two Events of Different Distances at the Same Time: Quantum-AQ Specific Instructions (click to expand)
Although there are several ways to record results for two events of different distanecs swimming in the water at the same time (incrementing lap counts / copying heat results in the Quantum-AQ), the following is the easiest and most fail-safe method.
The following example assumes Lanes 1-6 are swimming a 1500m FR and lanes 7-8 are swimming an 800m FR.
Step 1: Quantum OperatorStep 2: HyTek Operator
- Open the longer event, i.e., Event 11 (1500m FR).
- After each of Lane 7 and Lane 8 finish their 800 FR, click the corresponsing Lane Module
7 /8 , thenY : DisArm touchpad (or use the[LaneX] + Yhotkey) to disarm the touchpad.- Next, click the corresponsing Lane Module
7 /8 , thenEdit Finish Time . When the pop-up appears, manually type the Finish Time (no colons (:) or decimal points (.) necessary)
- This is because HyTek will populate the Finish Time using the LAST time(s) in the QAQ file, but splits are populated from the BEGINNING.
- Note: Advanced users can use the
Events menu to "Prop" the Finish Touchpad Time and Backup Button Times into the Finish Split.- Once all swimmers are finished, Officialize the race as normal.
- Pull times for the longer event (e.g. 1500m FR) as normal using the
[Name] : F3 or[Name] : Ctrl-F3 buttons.- Pull times for the shorter event (e.g. 800m FR) using the Race Number method above.
- If necessary, manually type the Backup Button / Plunger times into the corresponding cells. Ask the Quantum Operator to write them down for you if needed.
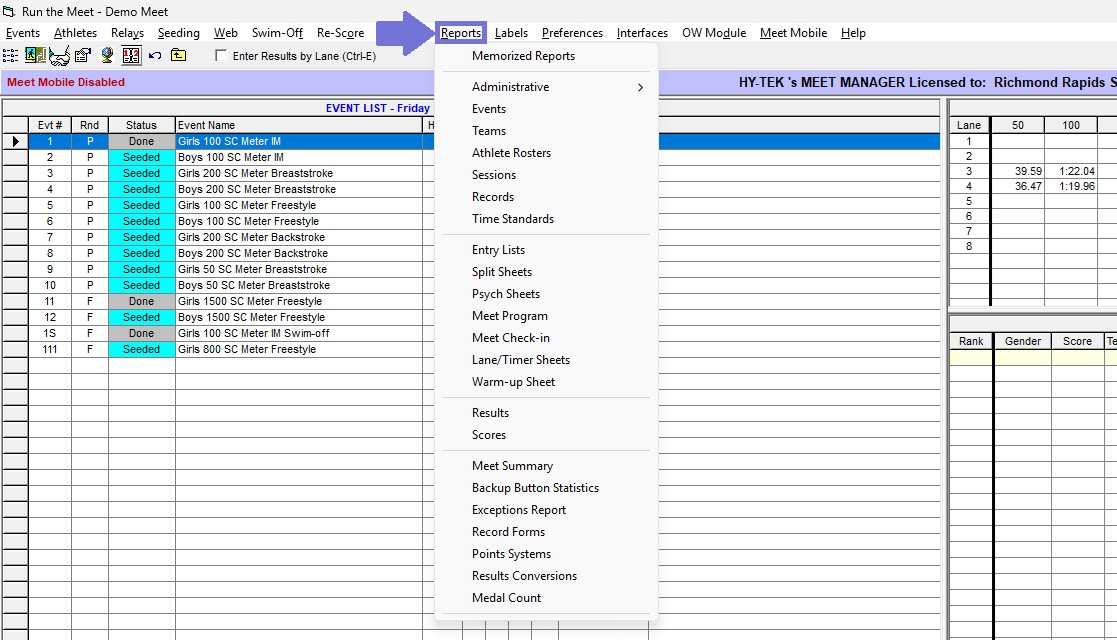
Paperwork: The Reports Menu
Most paperwork ("Reports") that you may need to generate and/or print are produced from the
- Session Reports
- Heat Sheets ("Meet Program")
- Psych Sheets
- Results
- Lane/Timer Sheets
- Score Summaries
- High Point Report (via "")
- Fee Reports (via "Team Reports")
- Positive Check-In Sheet ("Meet Check-In")
The Reports menu. (Click to collapse image.)
Session Reports
Session Reports can be generated from theClick
There are three options that you should always keep
- Include event start times: Includes the predicted/calculated Start Time for each event.
- Include heat and event entries: Includes the number of Heats and Entries for each event.
- Include * type entries: Generally doesn't make a difference. However, ensures that entries with a Special (*) indicator are counted in Heat and Entry counts.
- Include Team List: Includes the number of swimmers in each session by Team. Useful for determining team splits for split warm-ups.
- Separate page each session: Puts each selected session on a new page.
- Each event run in two pools: Enable if session is Double-Ended Short Course by Odd/Event Heats. (Do NOT use for Long Course Chase — instead, use the Chase Interval option when setting up Sessions.)
The Session Report menu. (Click to collapse image.)

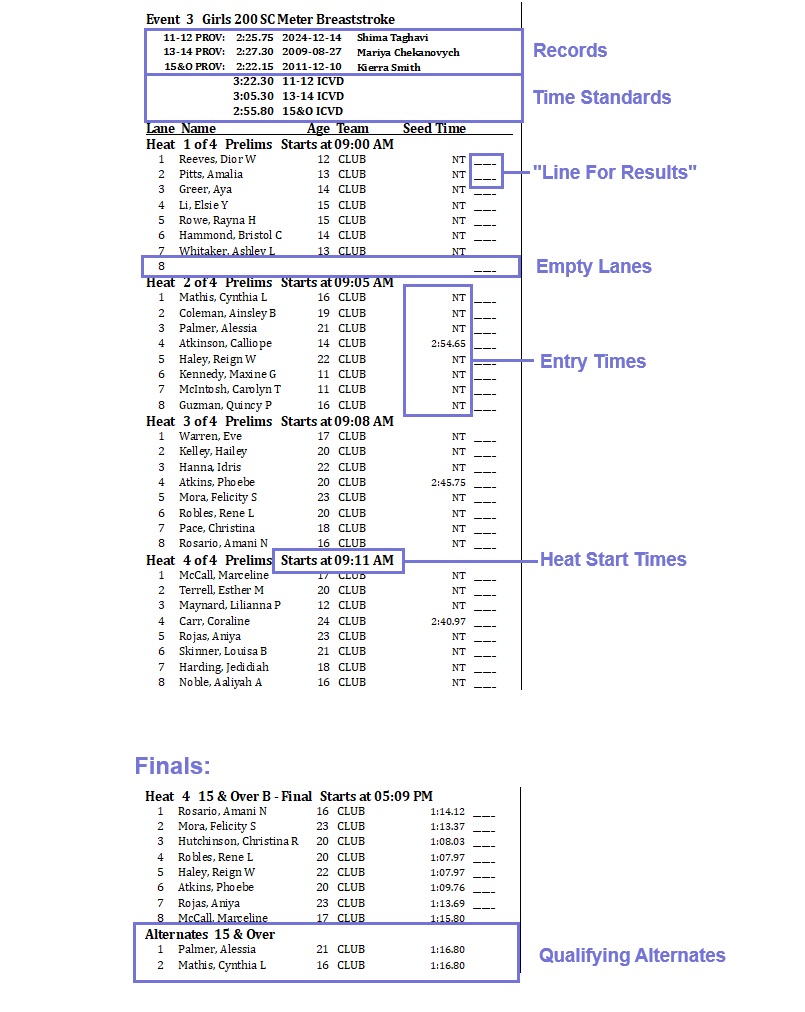
Heat Sheets / Meet Programs
Also known as Start Lists in other programs (e.g. Splash Meet Manager), Heat Sheets are called "Meet Programs" in HyTek Meet Manager. Meet Programs can be generated from theWhen the
At the bottom of the
Generally, the following fields should be checked under the
- Entry Times: includes Seed Times (or Prelims Times, for Finals events) in the Meet Program.
- Empty Lanes: keeps empty lanes in Meet Program. If unchecked, empty lanes are not shown.
- [Finals] Qualifying Alternates: includes Alternates for Finals Events.
- Heat Start Times: [recommended] shows estimated start time of each heat. Exclude if not accurate (e.g. double-ended by odd/even heats with all Relays running in one tank).
- Relay Athlete Names: how many relay athletes to show on the Meet Program. Generally: set to 0 if Relay Names not yet processed; set to 4 is Relay Names have been processed.
- Line For Results: [aesthetic - recommended for Meet Programs] shows a line next to the Seed Time.
- Records: (if set up) shows Records at the top of each event.
- Time Standards: (if set up) shows Time Standards at the top of each event.
- Logos In Footer: (if set up) shows logos (e.g. sponsors, meet organizers) at the bottom of each page.
Columns : Double/Single (Single Column for announcers)
The Meet Program menu. (Click to collapse image.)
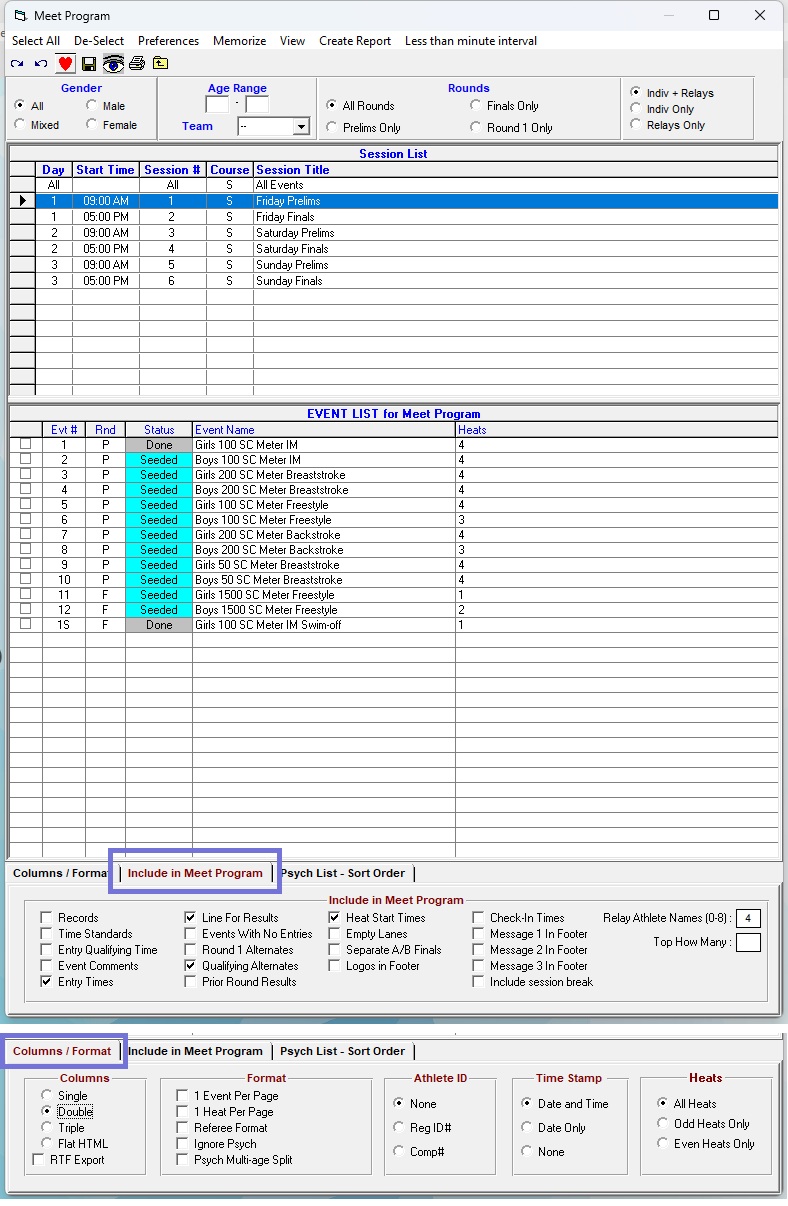
Customizable elements for Meet Programs. (Click to collapse image.)
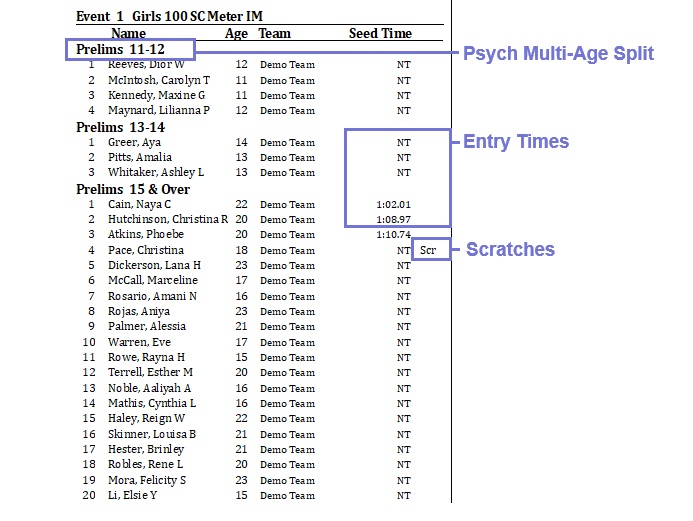
Psych Sheets
Also known as Entry Lists in other programs (e.g. Splash Meet Manager), Psych Sheets can be generated from theWhen the
Click
Generally, the following fields should be checked under the
- Entry Times: includes Seed Times (or Prelims Times, for Finals events) in the Meet Program.
- Relay Athlete Names: how many relay athletes to show on Psych Sheet. Generally: set to 0 if Relay Names not yet processed; set to 4 is Relay Names have been processed.
- Line For Results: [aesthetic - not recommended for Psych Sheets] shows a line next to the Seed Time.
- Scratches: Includes athletes that are marked as Scratched in the Psych Sheet.
- Records: (if set up) shows Records at the top of each event.
- Time Standards: (if set up) shows Time Standards at the top of each event.
- Events With No Entries: shows a header for events with no entries. If unchecked, events with no entries are skipped.
- Logos In Footer: (if set up) shows logos (e.g. sponsors, meet organizers) at the bottom of each page.
Columns : Double/Single- Psych Multi-Age Split: If checked,
The Psych Sheets menu. (Click to collapse image.)
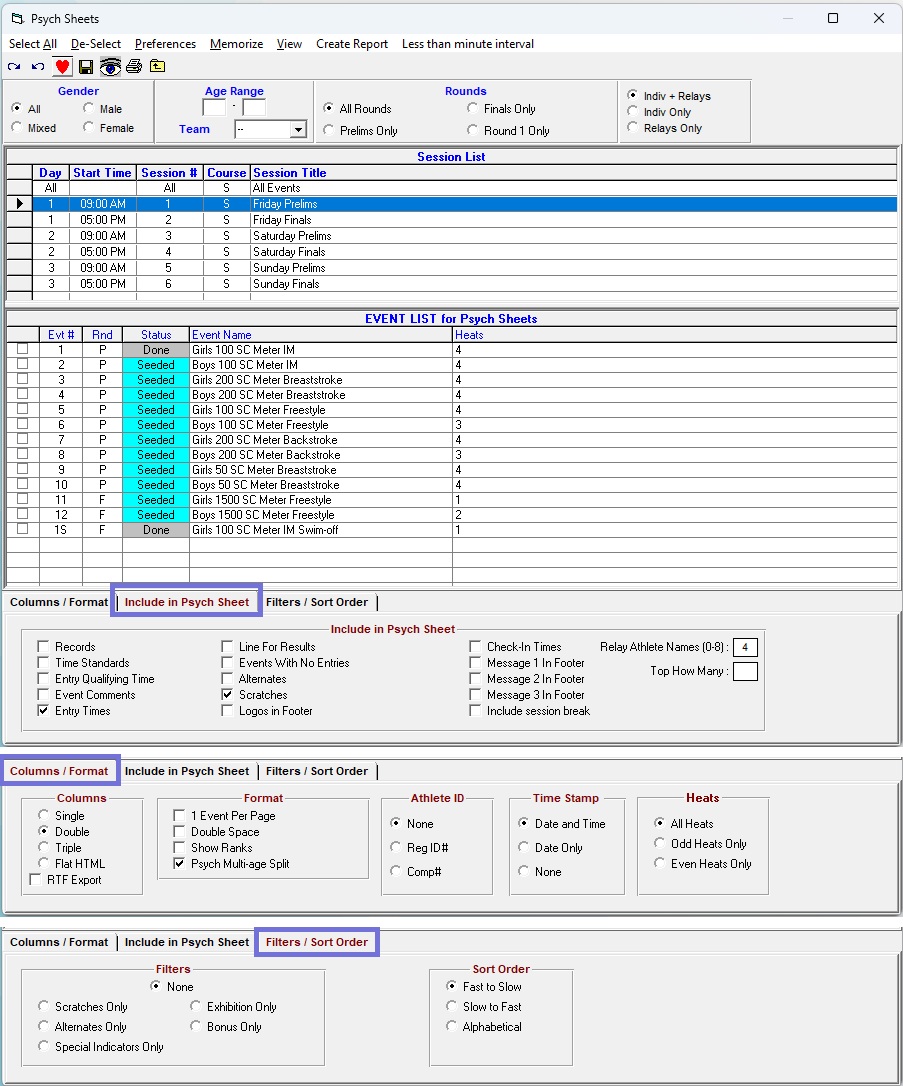
Customizable elements for Psych Sheets. (Click to collapse image.)
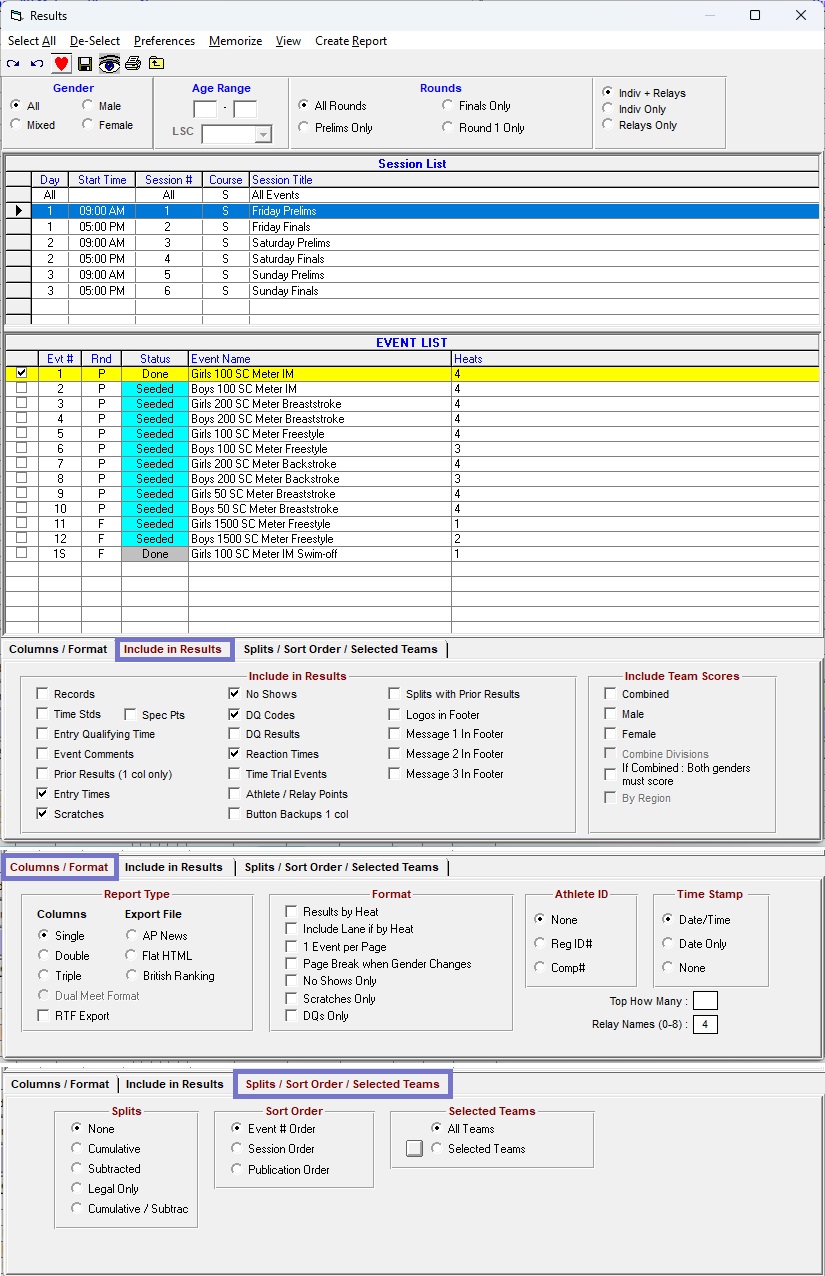
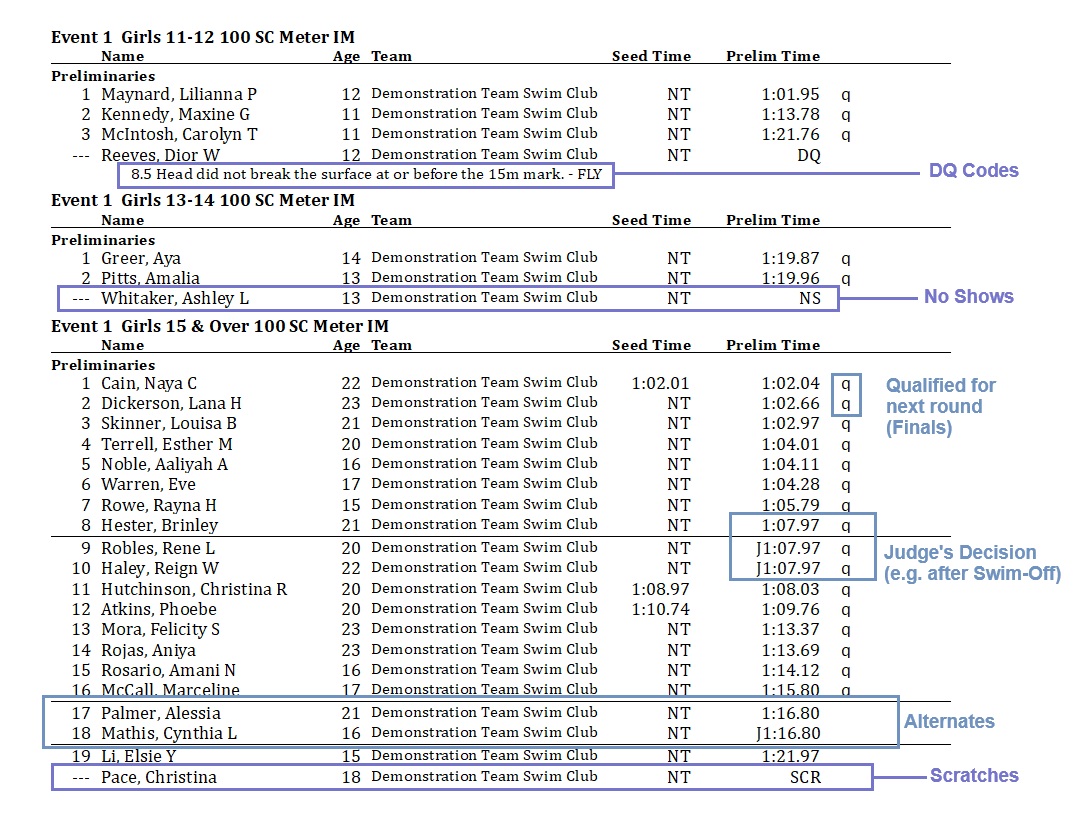
Results
Results using the Reports Menu
Results can be generated from the When the
Click
Generally, the following fields should be checked under the
- Entry Times: Includes the swimmer's Seed Time (or Prelims time, for Finals results)
- DQ Results: checking this field will report the swimmer's time, in spite of a DQ. This field should be UN-checked, pursuant to AQUA rule SW 11.4.
- No Shows: checking this field reports swimmers marked as No Show at the bottom of the results. Un-checking this field will hide them.
- Scratches: checking this field reports swimmers marked as Scratch at the bottom of the results. Un-checking this field will hide them.
- DQ Codes: checking this field will show DQ reasons based on entered DQ codes. Required for Masters competitions pursuant to AQUA Masters Swimming Rule 2.4.2 / Swimming Canada Part VIII, Rule 3.3.8. See Setting Up Custom DQ Codes and Processing DQs for more information.
The Results menu. (Click to collapse image.)
Customizable elements for Psych Sheets. (Click to collapse image.)
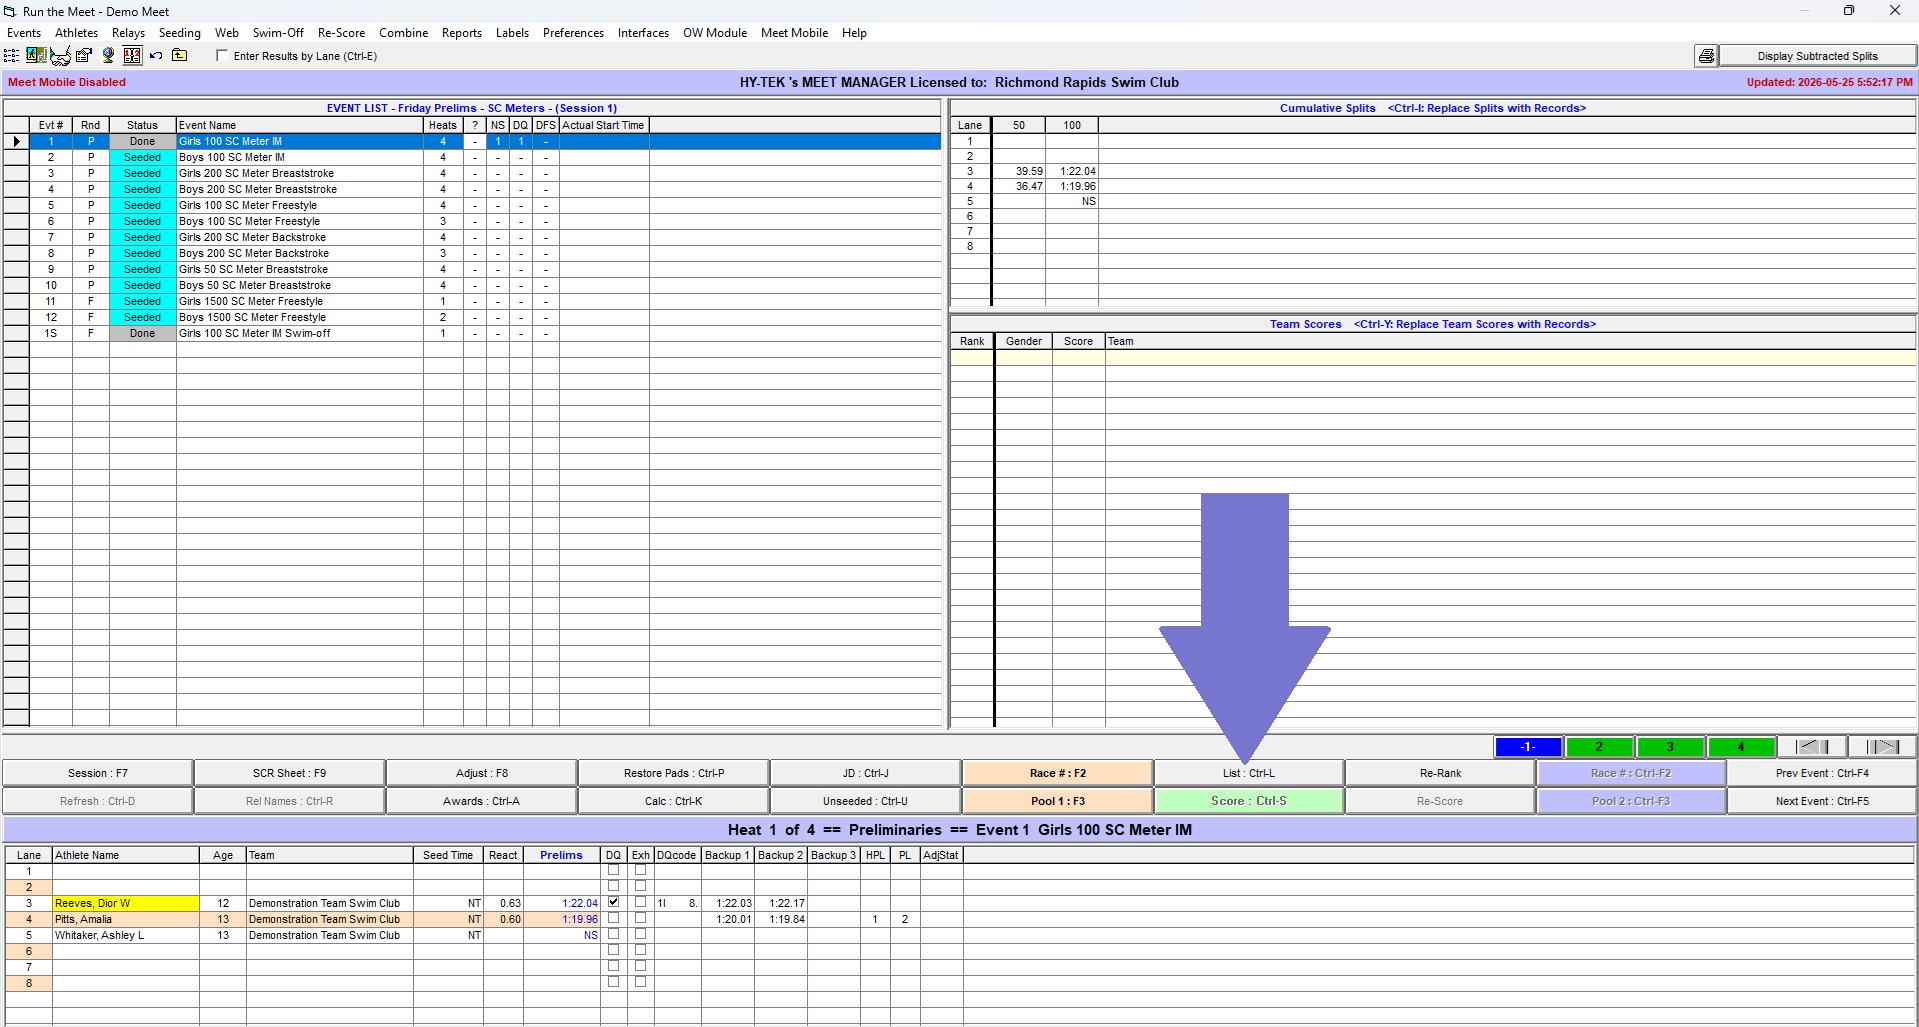
Results using the List Button
You can generate Results for one event at a time while inside the - Navigate to your event of interest in the
EVENT LIST . - Click the
List : Ctrl-L button to generate the Results List.
The List button. (Click to collapse image.)
Scoring using the Score Button
If Scoring is set up, you must use the - Navigate to your event of interest in the
EVENT LIST . - After all heats are finished, click the
Score button to calculate scores and generate a Results List with scores.
Results List with Scoring. (Click to collapse image.)
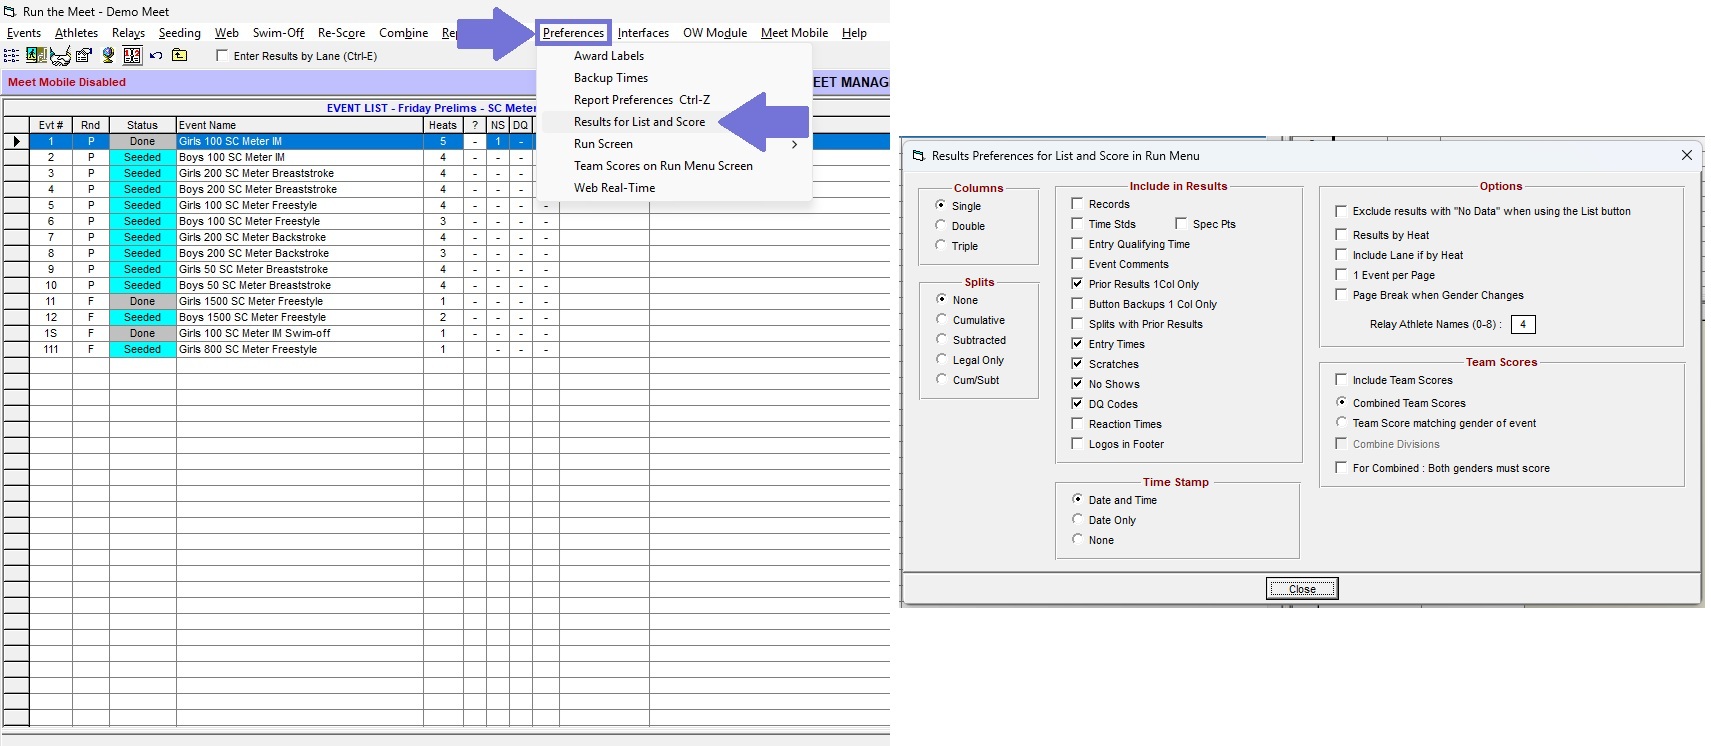
Modifying Results Settings using Results for List and Score
Changes to the format of Results generated using the The Results for List and Score menu. (Click to collapse image.)
Report Preferences
Master Report Preferences can be modified in theReport Formats > Show 2nd club with primary team: If an athlete is registered with two clubs, show both clubs. Commonly used for Para Exception Codes (see Para Codes of Exception).Footer > Add Logos for Meet Program/Results FootersPrinter Options > Default Report PrinterPrinter Options > Print Directly for Reports: Automatically prints reports if theList : Ctrl-L ,Score : Ctrl-S , orCreate Report buttons are pressed, without any preview.Printer Options > Number of Copies to print by default for each report.
The Report Preferences menu. (Click to collapse image.)

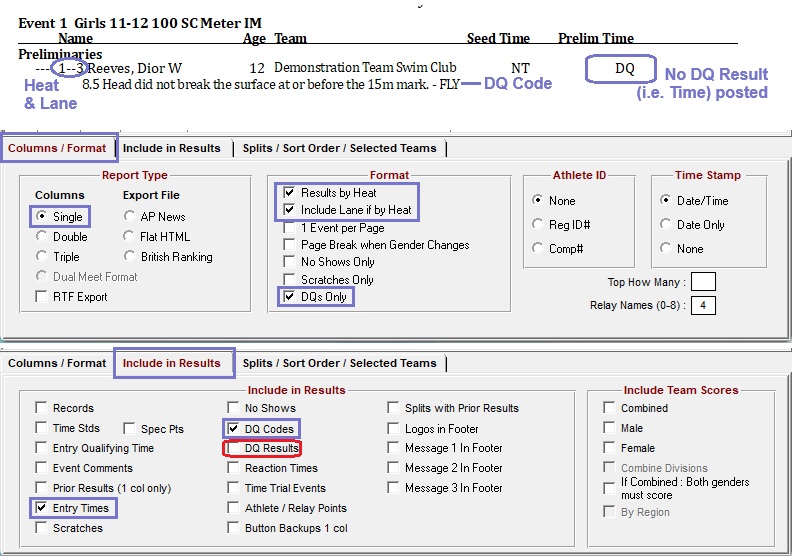
DQ Reports
A DQ Report is simply a type of Results report that only shows disqualifications.Navigate to
Check the following boxes in the
- Results by Heat
- Include Lane if by Heat
- DQs Only
Generating a DQ Report. (Click to collapse image.)
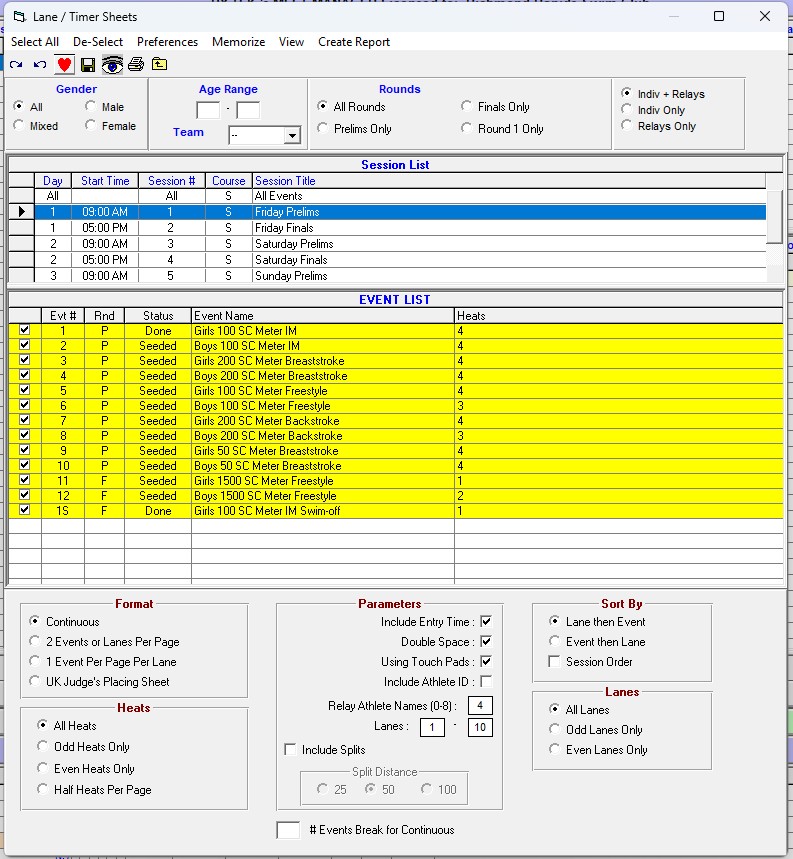
Lane Timer Sheets
Navigate to- If running Double-Ended by Odd/Even Heats (e.g. Long Course Chase), you may want to print Odd/Even Heats Only.
- If at a Ten-Lane Pool, you may need to change the
Lanes : to 0-9 from 1-10. - If some events are Double-Ended/Chase but other events are not, you will have to generate one set of Lane/Timer Sheets for the Double-Ended (Odd/Even Heats Only) events, then one set of sheets for All heats.
The Lane/Timer Sheets menu. (Click to collapse image.)
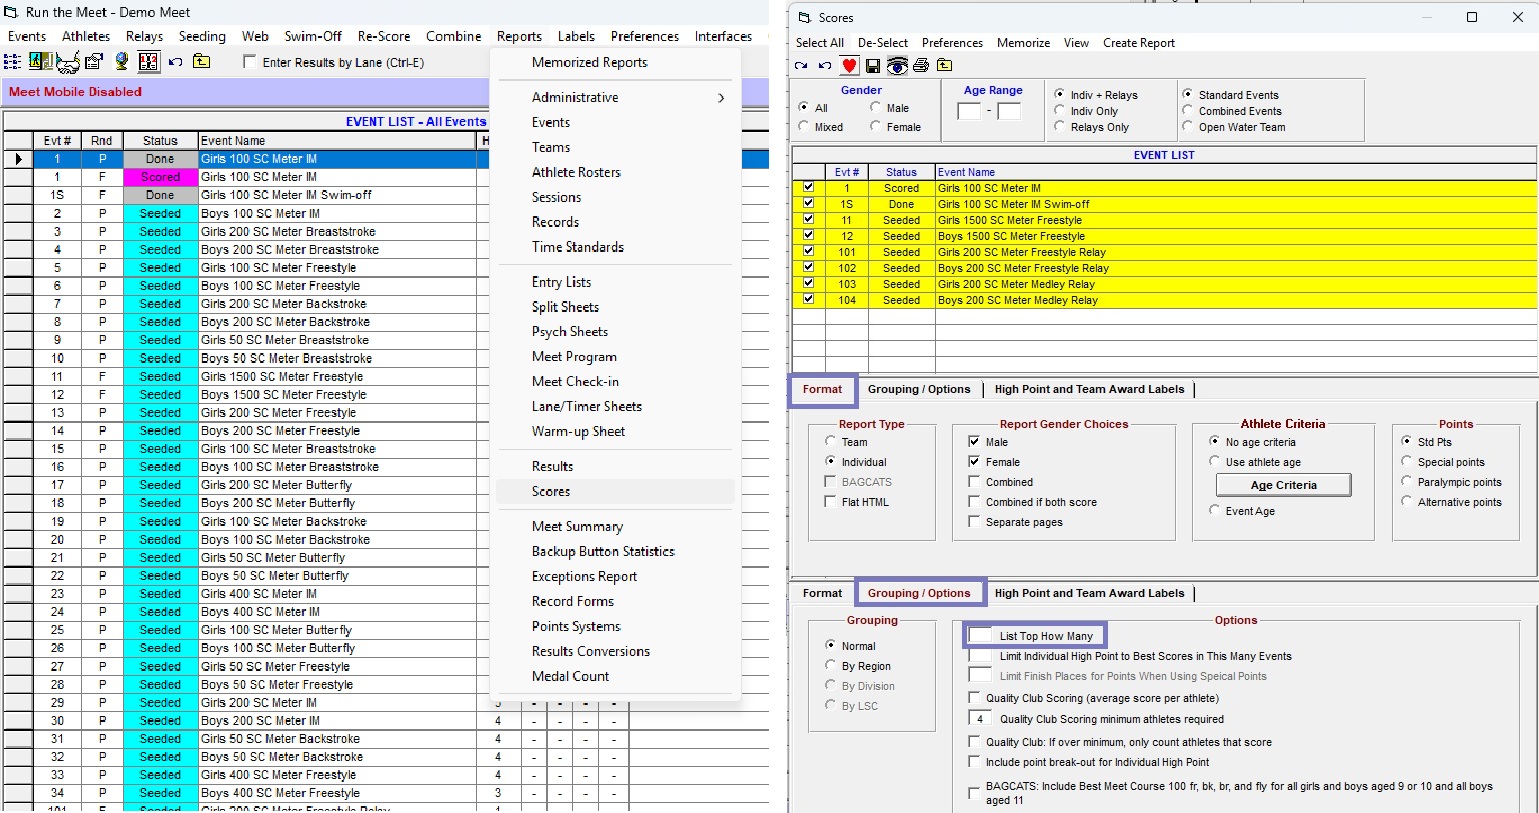
Score Reports
Score reports are commonly used for Top Scoring Team Awards, Top Para-Point Scoring Awards, and High Point Awards.Navigate to
In the
Under the
Generating Score Reports.
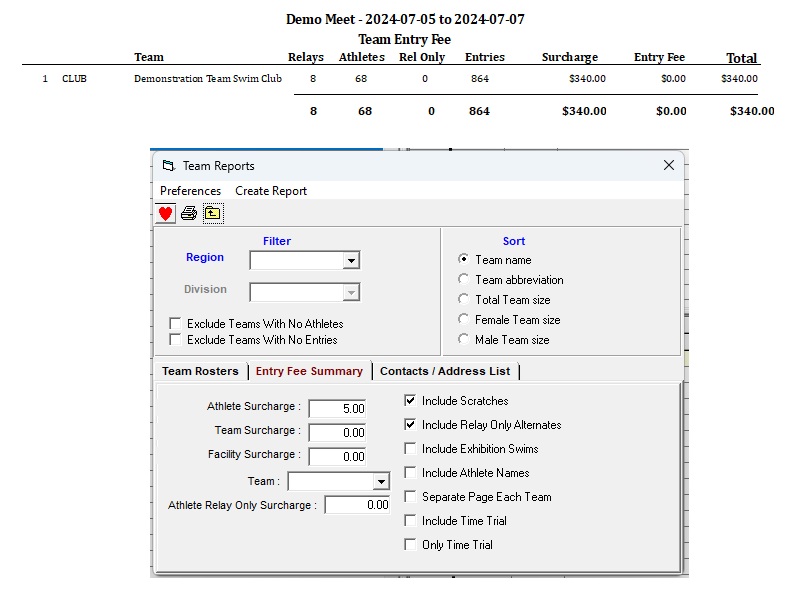
Fee Reports
To generate a Fee Report for each Team's entry fees, navigate toFee Reports.
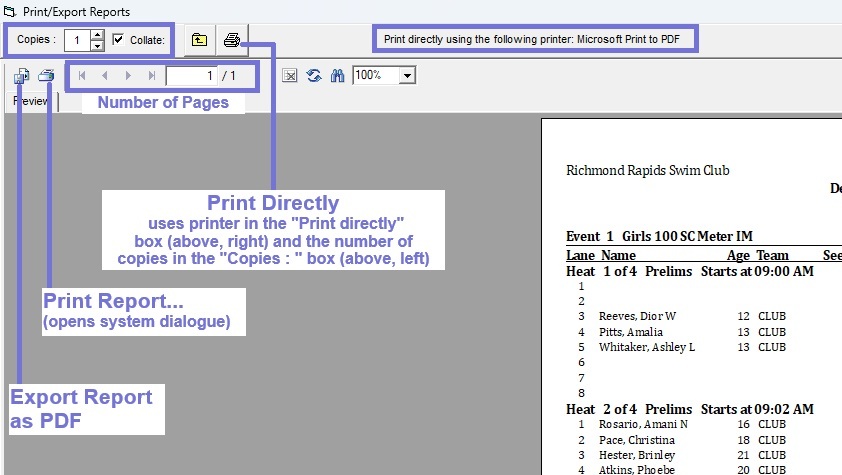
Printing & Exporting Results
When you click![[Printer Icon]](https://meetresults.ca/williamli9300/swimOfficialsToolkit/hytek/img/print_direct.jpg) at the top to Print Directly, using the Printer defined in the "Print directly using ..." textbox and number of copies defined at the top left, or use the Save to Disk or Print
at the top to Print Directly, using the Printer defined in the "Print directly using ..." textbox and number of copies defined at the top left, or use the Save to Disk or Print ![[Disk and Printer double-icon]](https://meetresults.ca/williamli9300/swimOfficialsToolkit/hytek/img/print_export.jpg) buttons to Export (left) or Print (right) using the system dialogues.
buttons to Export (left) or Print (right) using the system dialogues.
Printing or Exporting Reports.